Beejartha

Categories
Oracle APEX

Integrating India’s UPI API with Oracle APEX: A Step-by-Step Guide

Unified Payments Interface (UPI) has revolutionized digital payments in India by offering a seamless and efficient way to conduct transactions. For businesses and developers using Oracle Application Express (APEX), integrating UPI can enhance your application by providing users with a convenient payment method. In this blog post, we’ll explore what UPI is, why it’s beneficial, and walk you through the process of integrating UPI with Oracle APEX.

What is UPI?

UPI is a real-time payment system developed by the National Payments Corporation of India (NPCI). It enables users to link multiple bank accounts to a single mobile application, facilitating quick and secure transactions. With UPI, users can make peer-to-peer payments, pay bills, and complete transactions with just a few clicks.

Benefits of UPI Integration

  1. Instant Transactions: UPI transactions are processed in real-time, making it ideal for quick payments.
  2. User-Friendly: UPI provides a simple and intuitive interface for users.
  3. Cost-Efficient: UPI transactions generally incur lower fees compared to traditional banking methods.
  4. Enhanced Security: UPI employs robust security measures to protect users’ financial information.

Integrating UPI with Oracle APEX

Oracle APEX is a powerful low-code development platform that simplifies the creation of web applications.

Integrating UPI into your Oracle APEX application involves several steps, including setting up a payment gateway, configuring web services, and handling payment responses. Let’s walk through the integration process.

Step 1: Choose a UPI Service Provider

To integrate UPI, you’ll need to use a payment gateway provider that supports UPI transactions. Popular options include Razorpay, Paytm, and PhonePe. For this guide, we’ll use Razorpay. Sign up for an account with Razorpay and obtain your API key and secret.

Step 2: Set Up Web Services in Oracle APEX

  • Login to Oracle APEX: Access your Oracle APEX workspace and navigate to the application where you want to integrate UPI.
  • Create a Web Service:
    • Go to the “SQL Workshop” section.
    • Select “RESTful Web Services” and create a new RESTful Web Service.
  • Define the Web Service:
    • Set the “Base URL” to the endpoint provided by your payment gateway (e.g., Razorpay’s API endpoint).
    • Configure the HTTP methods (GET, POST, etc.) based on the API documentation provided by your payment gateway.
  • Authentication:
    • Implement authentication using the API key and secret provided by your payment gateway.
    • Use the “Web Credentials” feature in APEX to securely store your credentials.

Step 3: Create an API Integration

  1. Create a New PL/SQL Process:
    • Go to “App Builder” and select the page where you want to add UPI payment functionality.
    • Create a new PL/SQL process to handle the payment request.
  2. Set Up the Payment Request:
      • Use the PL/SQL code to call the payment gateway’s API. Here’s an example using Razorpay’s API to create an order:


    DECLARE
    l_order_response clob;
    l_http_request uow_request;
    l_http_response uow_response;
    l_url varchar2(32767);
    BEGIN
    l_url := 'https://api.razorpay.com/v1/orders';
    l_http_request := utl_http.begin_request(l_url, 'POST', 'HTTP/1.1');
    utl_http.set_header(l_http_request, 'Content-Type', 'application/json');
    utl_http.set_authentication(l_http_request, 'YOUR_RAZORPAY_KEY_ID', 'YOUR_RAZORPAY_KEY_SECRET');
    utl_http.write_text(l_http_request, '{"amount":50000,"currency":"INR","payment_capture":1}');
    l_http_response := utl_http.get_response(l_http_request);
    l_order_response := utl_http.get_text(l_http_response);
    dbms_output.put_line(l_order_response);
    utl_http.end_response(l_http_response);
    END;

    • Replace YOUR_RAZORPAY_KEY_ID and YOUR_RAZORPAY_KEY_SECRET with your actual credentials.
    • Handle the Response:
      • Parse the response from the payment gateway to extract necessary details such as order ID and payment link.
      • Display the payment link or redirect users to complete the transaction.

Step 4: Implement Payment Confirmation

  1. Create a Callback Page:
    • Set up a page to handle payment confirmations. This page will receive payment status from the payment gateway.
  2. Handle Payment Status:
    • Implement a process to verify the payment status using the details sent by the payment gateway. For example:


DECLARE
l_payment_id varchar2(255);
l_payment_status varchar2(255);
BEGIN
-- Extract payment ID and status from the request
l_payment_id := :P1_PAYMENT_ID;
l_payment_status := :P1_PAYMENT_STATUS;
-- Verify payment status (implementation depends on gateway API)
IF l_payment_status = 'success' THEN
-- Update order status or perform necessary actions
dbms_output.put_line('Payment successful!');
ELSE
dbms_output.put_line('Payment failed.');
END IF;
END;

  1. Configure Webhooks (Optional):

Some payment gateways offer webhooks to notify your application of payment events. Configure webhooks as per the gateway’s documentation to automatically handle payment updates.

Step 5: Test and Deploy

  1. Testing:
    • Test the integration thoroughly using the payment gateway’s sandbox environment. Ensure that all scenarios (e.g., successful payments, failed payments) are handled correctly.
  2. Deployment:
    • After successful testing, deploy your application to the production environment. Switch to live credentials and monitor transactions to ensure smooth operation.

Conclusion

Integrating UPI with Oracle APEX can significantly enhance your application’s payment capabilities, offering a convenient and secure option for users. By following the steps outlined in this guide, you can successfully integrate UPI into your APEX application, enabling real-time payments and improving user experience.

If you have any questions or need further assistance, feel free to leave a comment below. Happy integrating, and may your UPI implementation be smooth and successful!

Categories
Oracle APEX

Oracle APEX QR Code Generator

Hello readers. I see you are interested in learning about the QR Code generation using Oracle APEX. Great news, the APEX team has your back! The team has added a QR Code item component to the APEX development toolset. Please allow me to briefly examine the QR (Quick Response) Code and then move on to discuss the QR Code component basics and then you can use your imagination to build the QR Code you are looking for in your APEX application.

What is a QR Code?

A Quick Response (QR) Code serves as a means to instantly retrieve information. Originally, the code was developed in 1994 by a Japanese company to label vehicle parts. The QR Code is a two dimensional barcode that keeps data in a square grid of black and white pixels. When the square barcode is scanned, the arrangement of pixels is handled to quickly direct to the information. QR Codes today have evolved and are becoming more popular. They can store a variety of data, such as web URLs, social media links, product data, and contact details.

What is a QR Code?

In APEX 23.1, a QR Code page item component was introduced.

What is a QR Code?

Select the type of content that this QR code contains, and a corresponding prefix value is inserted in front of the selected source value to affect how the user QR Code scanner will interact with the content. Available options include:

Plain Text

URL:- The URL will open in a browser.

Phone:- Open the phone app with the input number. The phone number can contain special characters ‘(‘ , ‘)’, ‘+’, ‘-‘, ‘.’, and spaces. The exact format of the phone number delegates to the phone’s locale settings.

Email:- Compose a new email to an email address. The expected format of the email address is a valid email address without leading or trailing spaces.

SMS:- Compose a text message to a number. The phone number can contain special characters ‘(‘ , ‘)’, ‘+’, ‘-‘, ‘.’, and spaces. The exact format of the phone number delegates to the phone’s locale settings.

Geo location:- Open a map application to specific coordinates. The expected format of the input coordinates is: latitude, longitude with no leading or trailing spaces.

Add a QR Code page item

There are several ways to add a page item, however, make sure TYPE IS QR CODE. Select the TYPE from the drop-down list, if necessary.

Next, select the QR Code DATA TYPE option from the dropdown list, if necessary. Lastly, select the Source TYPE option from the drop-down list, if necessary. This option type needs to contain
information that is associated with the QR Code DATA TYPE selected.

NOW RUN PAGE!

Yes, the Oracle APEX team has made it that easy!

Categories
Oracle APEX

Oracle APEX Workspace System Activities Application

Application Overview

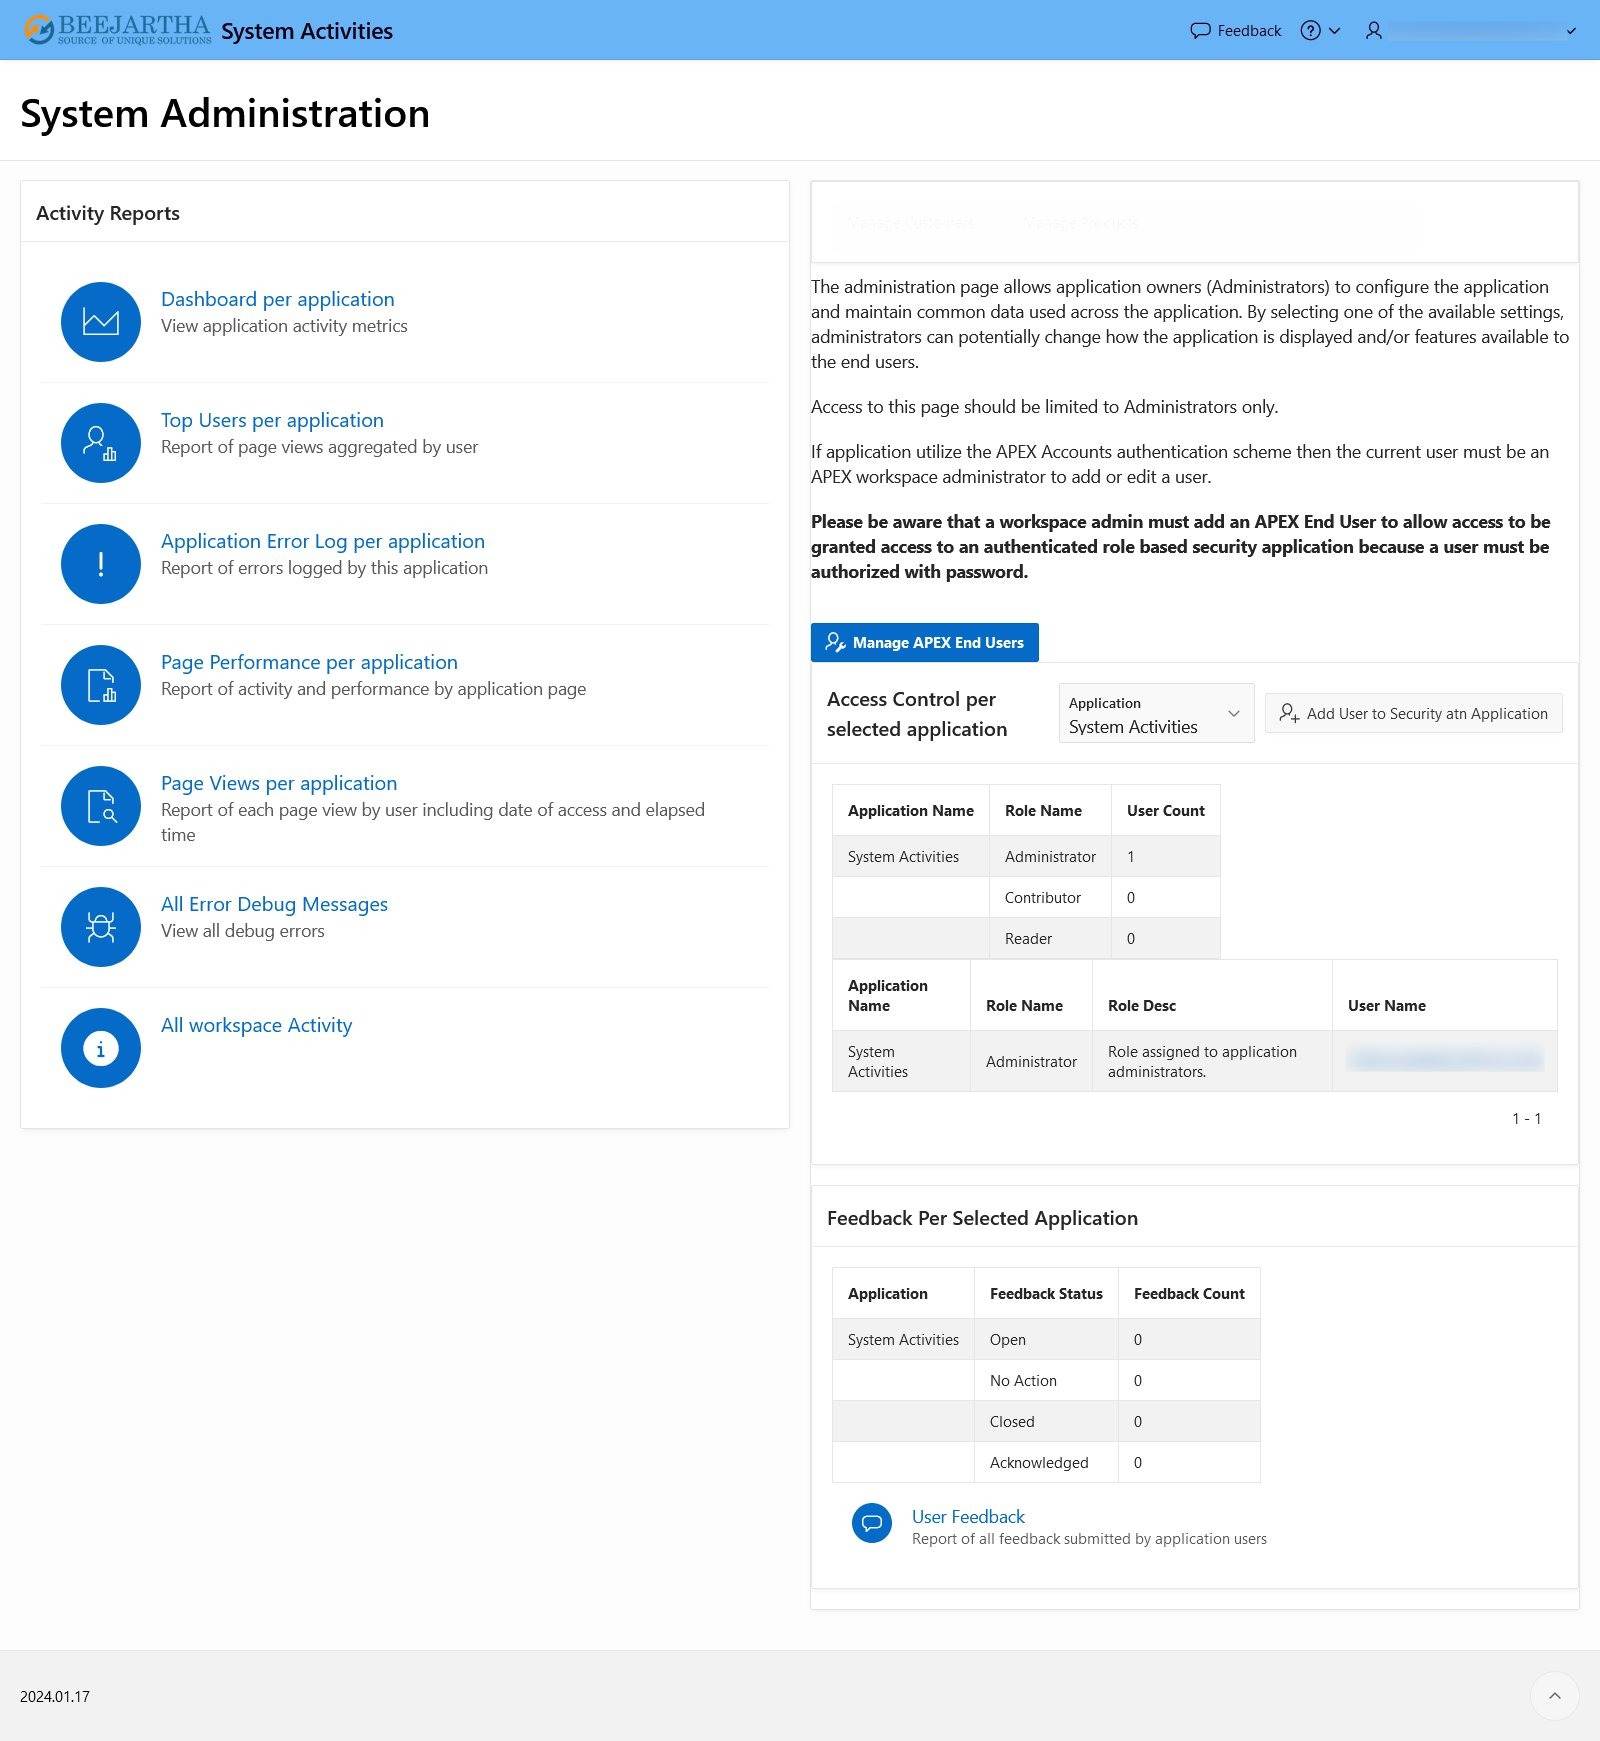
I created an application to allow internal company developers and workspace administrators to monitor all applications built in a workspace and maintain users on security-based roles, if enabled for an application. Workspace administrators can also manage workspace users.
Unfortunately, I cannot provide a demonstration of the application since it is about all applications in a workspace that is protected information. However, I can tell you how to get started with some built-in Oracle APEX features and of course, my own creativity of enhancements and improvements to make this a better system application, especially for a productional workspace. If you are interested in my version of the System Activities Administration Application, please feel free to contact us for a private demonstration and we will be happy to provide you our working coping of the application and assist in the implementation in your own workspace for a nominal fee if you like. See Home Page for a screenshot of the
main page.

Getting started with Oracle APEX features

In the Oracle APEX App Builder, click the Create link icon to enable
the app wizard. On the next page enter an application name, such as System Activities Administration. Then click the link Use Create App Wizard. See screenshot below.

The next screenshot II below is the App Wizard. Make sure the application Name is correct and check the 5 features,

  1. Install Progressive Web App,
  2. Access Control
  3. Feedback
  4. Push Notifications
  5. Activity Reporting.

Next click the green Create Application button.

Wait a few seconds and the new application is created.
Now before you run the application let’s make an important change that will allow you to see all the added features after logging into the application.

1) Edit the application in the App Builder
a. Locate the Home page.
i. Edit page to delete page by clicking on the Utilities icon and Delete Page from the pop-up menu.
b. Locate the Administration page (page 10000).
i. Edit the page Identification section properties as shown below. *Make sure the page Alias is home

Now you are ready to run the application and look around! Notice that this does NOT currently serve as a System utility but as an application utility. My Enhancements and Improvements section will convert this to a System utility.

Enhancements and Improvements
  1. Edit application in App Builder
  2. In shared components, edit the Breadcrumb bar, Administration page #10000 change the short name to System Administration. Click Apply Changes.
  3. In shared components, create a list of values.
    • Name – WORKSPACE APPLICATION
    • Database source – Local
    • Source type – SQL query
    • SQL query – select DISTINCT APPLICATION_ID, APPLICATION_NAME from APEX_WORKSPACE_ACTIVITY_LOG L
    • Return – APPLICATION_ID
    • Display – APPLICATION_NAME
    • Default sort – APPLICATION_NAME
  4. Add a select list page item to the follow pages:
    • Page #10000 see Home screenshot below for location.
      • Name – <PAGE#>_APP_ID
      • List of Values section Type – Shared Component
      • List of Values section List of Values – WORKSPACE APPLICATION
      • IF page has a timeframe: Locate existing Change Filters dynamic action and include the new <PAGE#>_APP_ID in item(s) under the When section ELSE Create a Change Filters dynamic action and add the new <PAGE#>_APP_ID in item(s) under the When section; and add true refresh action for all affected regions or types.
      • Add dynamic actions to refresh regions when a dialog is closed that affects certain home page regions. Note: Only regions on the left side are affected
    • Page #10010 – Location next to timeframe.
    • Page #10011 – Location next to timeframe
    • Page #10012 – Location next to timeframe.
    • Page #10013 – Location next to timeframe
    • Page #10014 – Location next to timeframe.
    • Page #10022 – hidden. Make sure to refresh the roles after the existing APPLICATION_ID by converting it to a select list and changing the behavior property to dynamic action that will refresh roles for selected application.
    • Page #10033 – Location top of page.

As you can see from the Home page a couple more interactive report informational pages. I also added a classic report region for a list of ACL users and a button to Manage APEX End users along with a few modal window pages for added administrative functionality. Since the vast majority of pages are modal and all pages are referenced from the Home page, I did not see the need for a navigation menu and removed it from the application.

Home Page afterwards

Password Tip

If end users of APEX applications are not prompted to change their passwords on their first login
to the system and user accounts are using native APEX Authentication, and when logging in and
authenticating, APEX fails to prompt them to change their passwords even if the individual user
account property “Require Change of Password on First Use” is set to “Yes.”
Check to verify the “Account Expiration and Locking” property at either the Instance or
Workspace level is not enabled. When the “Account Expiration and Locking” property at either
the Instance or Workspace is not enabled, password expiration or “Require Change of Password
on First Use” policies are not enforced.
In order to enforce the “Require Change of Password on First Use” property on APEX
Authenticated users, the “Account Expiration and Locking” property must be set to “Enabled”
either at the APEX Instance level, or in your individual workspaces. If set to “Enabled” at the
Instance level, it cannot be overridden at the workspace level. If set to “Disabled” at the Instance
level, Workspace Administrators are free to choose whether to enable it in their individually
managed workspaces.

Check APEX Instance Administration

Manage Instance -> Security -> Workspace Login Control -> Require User Account Expiration
and Locking

Check APEX Workspace Administration

Administration -> Manage Service -> Set Workspace Preferences -> Account Login Control ->
Account Expiration and Locking

Information from Oracle Support

https://support.oracle.com/epmos/faces/DocumentDisplay?_afrLoop=112397227969565&parent=EXTERNAL_SEARCH&sourceId=PROBLEM&id=1946117.1&_afrWindowMode=0&_adf.ctrl-state=9led0qaaw_4

Categories
Oracle APEX

Oracle APEX Application with PayPal As a Payment option

If you are developing an Oracle APEX application and want to integrate PayPal as a payment option, you might wonder how to do it. In this blog post, I will show you how to use the PayPal REST API to create and execute payments from your APEX app.

The PayPal REST API allows you to create and manage payments, invoices, subscriptions, and other transactions. You can use it to accept credit cards, PayPal, Venmo, and other payment methods. To use the PayPal REST API, you need to create a PayPal developer account and get an access token.

The steps to integrate PayPal to your APEX app are:

  • Create a PayPal developer account and get an access token.
  • Create a payment object using the PayPal REST API.
  • Redirect the user to the PayPal approval URL.
  • Execute the payment using the PayPal REST API.
  • Confirm the payment status and display a confirmation message.

Let’s go through each step in detail.

PayPal Setup

Here are the steps to signing up for a PayPal Developer Account:

  • Go to https://developer.paypal.com/ and click on Log In.
  • If you already have a personal or business PayPal account, you can use it to log in. If not, you will need to create one first by clicking on Sign Up.
  • Once you are logged in, you will see your dashboard with various options and resources. You can explore the documentation, try out the APIs, and manage your apps and credentials.
  • To create an app, click on My Apps & Credentials in the left menu. Then click on Create App under the REST API apps section.
  • Give your app a name and choose a sandbox account to associate it with. A sandbox account is a dummy account that you can use to test your integration without using real money or data.
  • Click on Create App. You will see your app details, including your client ID and secret, which you will need to authenticate your API calls.
  • You can also toggle between sandbox and live mode, edit your app settings, and view your app transactions and webhooks.
  • To test your integration, you can use the sandbox accounts that are automatically created for you when you sign up for a PayPal Developer Account. You can view and manage these accounts by clicking on Accounts under the Sandbox section in the left menu.
  • You can also create new sandbox accounts, add or remove funds, and simulate different scenarios using the sandbox testing guide.
  • When you are ready to go live, you will need to submit your app for review and approval by PayPal. You can do this by clicking on the Live tab on your app details page and following the instructions.

Congratulations! You have successfully signed up for a PayPal Developer Account and created your first app. You can now start accepting payments online using PayPal’s secure and convenient platform.

APEX Integration

I have built a Demo APEX Application that will demonstrate the integration.

  • PayPal Javascript SDK

  • The PayPal JavaScript SDK is a modern and flexible way to accept PayPal, credit cards, debit cards, and alternative payment methods on your website. It allows you to customize the payment experience, handle dynamic payment scenarios, and optimize performance.
    The PayPal JavaScript SDK consists of two main components: the PayPal script tag and the PayPal buttons. The PayPal script tag is a single line of code that you add to your HTML page. It loads the PayPal JavaScript SDK and initializes it with your client ID and other configuration options. The PayPal buttons are UI components that render the PayPal button and handle the payment flow. You can use the PayPal buttons to create different types of payment buttons, such as smart buttons, subscription buttons, or custom buttons.

To get started with the PayPal JavaScript SDK, follow these steps:

  • Add the PayPal script tag to your HTML page. Replace YOUR_CLIENT_ID with your sandbox or live client ID. You can also specify other configuration options, such as currency, intent, commit, vault etc. For more details, see https://developer.paypal.com/docs/business/javascript-sdk/javascript-sdk-configuration/.
  • Add an element with an id of “paypal-button-container” to your page. This is where the PayPal button will be rendered.

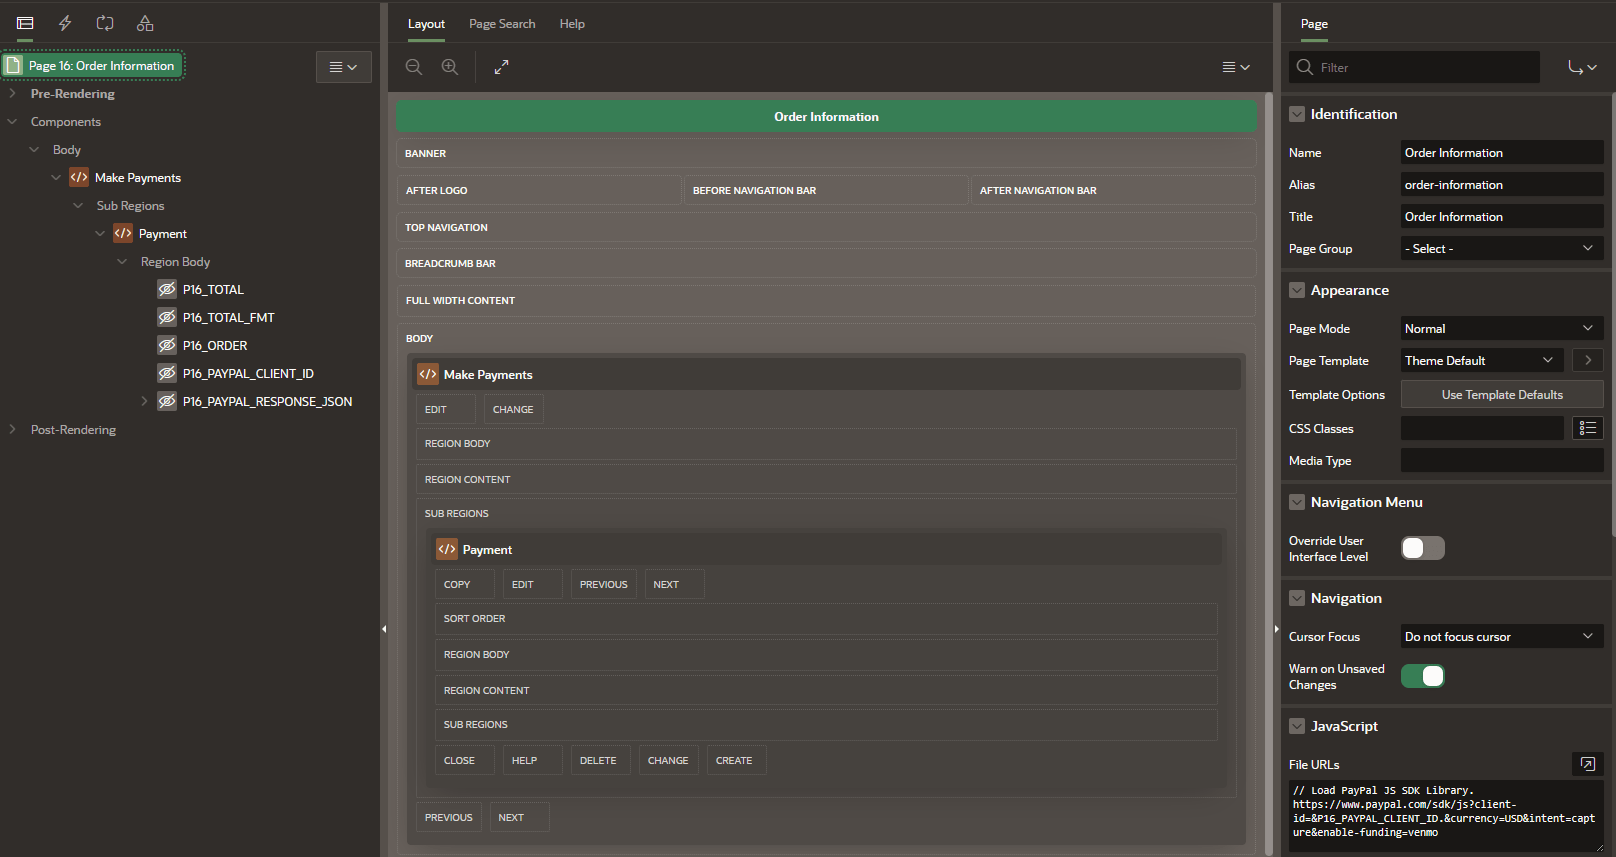
  • Loading PayPal JavaScript SDK by referencing it in the page’s JavaScipt FILE URLs section. Place this code at File URLs


// Load PayPal JS SDK Library.
https://www.paypal.com/sdk/js?client-id=&P16_PAYPAL_CLIENT_ID.¤cy=USD&intent=capture&enable-funding=venmo
// The URL above has four parameters;
Client_id => P16_PAYPAL_CLIENT_ID (Page Item)
Currency => USD
Intent => Get payments immediately

  • The code below (Code from PayPal Integration Builder) will be called when the user selects the payment option and captures the transaction in JSON object. Place this code at Execute when Page Loads


// Capture the Order Total.
var cartTotal = $v("P16_TOTAL");
const paypalButtonsComponent = paypal.Buttons({
// optional styling for buttons
style: {
color: "gold",
shape: "pill",
layout: "vertical"
},
// Prepare the PayPal transaction with the Order Total
createOrder: (data, actions) => {
const createOrderPayload = {
purchase_units: [
{
amount: {
value: cartTotal
}
}
]
};
return actions.order.create(createOrderPayload);
},
// finalize the transaction, called when user completes payment.
onApprove: (data, actions) => {
const captureOrderHandler = (details) => {
const payerName = details.payer.name.given_name;
// Store the PayPal JSON Response in an APEX Page Item.
$s("P16_PAYPAL_RESPONSE_JSON", JSON.stringify(details, null, 2));
};
return actions.order.capture().then(captureOrderHandler);
},
// handle unrecoverable errors
onError: (err) => {
// Additional Code required here to handle errors from PayPal.
console.error('An error prevented the buyer from checking out

When the user clicks the PayPal button, the PayPal SDK opens a dialog pop-up where one can log in with their personal or sandbox PayPal account (i.e. for testing purposes) and be able to make payments .

Once payment is done you will confirm your order

Categories
Oracle APEX

Oracle APEX Common Platform Types

If you are like me when I first got involved with Oracle Application Express (APEX) you did some research reading blog post and watching YouTube videos. However, many posts and videos, while correct, can cause many readers/watchers frustration and confusion the screens and or steps are not available to them. The question is WHY? Please allow me to elaborate on this topic based on my observations of the most common three different platform types.

Before I jump into platform types, let’s quickly mention APEX developed by Oracle. Oracle APEX itself is easy to learn for many with a technical web development aptitude as it uses standard web technologies such as CSS, JavaScript, jQuery, and SQL. Oracle APEX was developed by Oracle as a web IDE to develop web customized applications and is free to install on an Oracle database therefore PL/SQL can be referenced. Only the version changes are slightly different since they are frequent. Oracle makes changes and improvements to APEX every six months (twice a year). Version information being used can be found in the APEX workspace IDE that I will explain later in this document. If the article/video that you are using does not specify you might be able to make an educated guess if you can find the date posted.

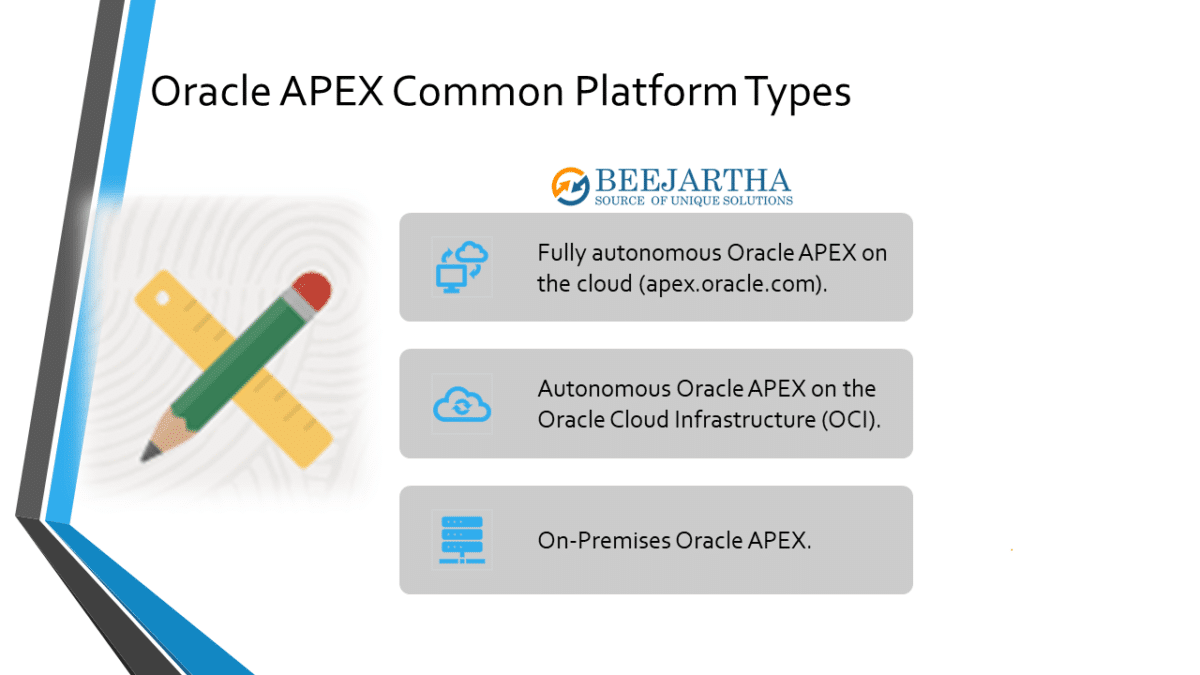
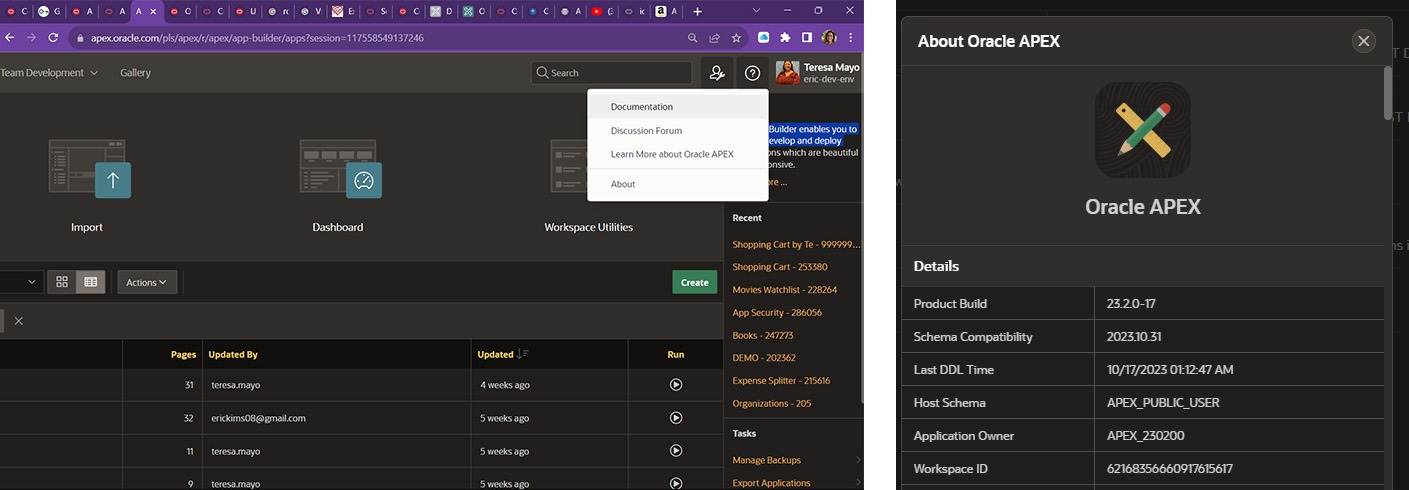
Now let’s discuss the three most common platforms and differences that I have personally experienced. Various kinds of APEX platforms do have varying options that can affect availability for certain components, for example, you do not have Administrative Services (ADMIN) on the fully autonomous Oracle APEX on the cloud (apex.oracle.com) free subscription, however, a few of the ADMIN features are available in the workspace to a workspace administrator user.

Three common platform types

Fully autonomous Oracle APEX on the cloud (apex.oracle.com) free subscription.

  • Oracle APEX controls the database and APEX versions and is fully responsible for updating. Once an upgrade becomes available, there is a 45-day window during which you can apply for the upgrade at the day and time you choose. If you take no action, Oracle applies the upgrade automatically. For paid service instances, you can elect to get a longer 90-day time window instead of 45 days. NO SYSDBA.

Autonomous Oracle APEX on the Oracle Cloud Infrastructure (OCI) free subscription.

  • Oracle OCI controls the APEX version, and database patches and is responsible for updating. By default, Autonomous Database applies Oracle APEX upgrades as soon as they are released in your region. You can set an option to defer upgrades for major Oracle APEX releases, such as an upgrade from 22.1 to 23.1, for up to 90 days. Note: The latest Oracle APEX Patch Set Bundles are automatically applied on Autonomous Database and cannot be deferred.
    The organizational administrator is responsible for installing the Oracle OCI database supported versions as well as the OCI operating system (OS) and other OCI options. NO SYSDBA.

On-Premises Oracle APEX.

  • The organizational administrator is responsible for installing and updating both the Oracle database, APEX version, and patches.
Fully autonomous Oracle APEX on the cloud (apex.oracle.com) free subscription.

Please pay special attention to the URL as seen in the screenshot below. This reveals that the platform is apex.oracle.com. Note the links directly below the Sign In button. Also notice the APEX Upgrade Notification message below the Oracle APEX sign in section region. These things can differ based on platform type and configuration.

Autonomous Oracle APEX on the Oracle Cloud Infrastructure (OCI) free subscription.

Please pay special attention to the URL as seen in the screenshot below. This reveals that the platform is OCI. Note the links directly below the Sign In button. Specifically, the Administrative Services link at the bottom of the workspace sign-in page. These things can differ based on platform type and configuration.

The Administration Services link means Admin privileges are available for this Oracle APEX database instance. Only the ADMIN username can login and ADMIN user password are required.

On-Premises Oracle APEX.

The platform is installed on the local Oracle database and by default the Administration Services link is present. SYSDBA is available since the organizational database administrator has full responsibility.

Specific Oracle APEX Information

Regardless of the platform, the APEX IDE seems to be consistent with moderate differences depending on the user type or APEX version. To find out specific details about Oracle APEX, Sign In the workspace. Click the ? icon in the top right corner of the APEX IDE. On the pop-up menu, click About.

Oracle APEX IDE Workspace View/Manage Information

Regardless of the platform, the APEX IDE seems to be consistent with moderate differences depending on the user type or APEX version. Only a workspace administrator user type can view/manage workspace details, Sign In the workspace. Click the Admin icon (person with wrench to the right of the search bar) in the top right corner of the APEX IDE. A pop-up menu appears with some options to choose from. Be aware these tasks are specific to ONLY this workspace.

Categories
Oracle APEX

Setting UserAccess Control

In this blog post, I will explain how to assign a role at Application Access Control in Oracle APEX. Application Access Control is a feature that allows you to define and manage user roles and permissions for your APEX applications. By assigning roles to users, you can control what they can see and do in your application.

To assign a role to a user, you need to follow these steps:

    1. In to your APEX workspace and open the application that you want to manage. In the App Builder tab in your browser, select your application, in our case DEMO, you will be navigated to your Application page.

    1. Shared Components on your application home page. Shared Components in Oracle APEX are components that can be shared across multiple pages or applications. These components include templates (themes), list of values, navigation bar entries, shortcuts, plug-ins, authentication schemes and authorization schemes.You can access the Shared Components page by selecting an application and then clicking Shared Components

    1. At the Security section, Click Application Access Control.

      You’ll navigate to another page where you will set user roles and role assignments,
    2. Click on Add Role, and create a role for your application, then enter the name
      • Name: Administrator
      • Click Apply changes

    3. Then click Add User Role Assignment to assign a user to the role created.
      • Name: Test@gamil.com — this should be your email address that will be used at login page.
      • Then apply changes.

    4. 6. Then head back to shared Components page Click Authorization Scheme.
      Go to Authorization Scheme section:

      • Scheme Type: Is In Role Group
      • Type: Application Role
      • Name: Select the role create, in our case Administrator.
      • Click apply changes.

    5. Then head back to shared Components page Click List Values
      • Name: ACCESS_ROLES
      • Source Type: SQL QUERY


      select role_name d, role_id r
      from APEX_APPL_ACL_ROLES where application_id = :APP_ID
      order by 1

Then apply changes, and your good to go.I hope this was helpful and informative.

Categories
Oracle APEX

Progressive Web Application

A Progressive Web Application (PWA) is a type of application software delivered over the web and built using web technologies such as HTML, CSS, JavaScript and Web Assembly. It is designed to run on any platform with a standards-compliant browser, including desktop and mobile devices. A PWA can look and feel like a native application, with features such as a home screen icon, notifications and offline access. A PWA is a type of web application that does not require separate bundling or distribution.

Progressive Web Applications (PWA) have several advantages;

  • They run full screen on a mobile device or in a separate window on a computer, providing a better look and feel.
  • Device integration provides access to device features such as geolocation, camera and sharing capabilities. Increased page rendering performance due to advanced caching provided by the installed device.
  • PWAs have a small footprint and take up very little space compared to native applications.
  • It also has the advantage that the application can be updated without the end user having to update the native application.
  • PWAs can become active engagement tools over traditional passive web browsing experiences, based on their ability to leverage device capabilities available to end users and create more compelling and engaging user experiences than traditional browser-based applications.

Oracle APEX enables developers to build PWAs with minimal effort and configuration. In this blog post, I will show you how to set up a PWA in Oracle APEX using the following steps:

Creating a PWA in Oracle Apex

At oracle apex its merely a simple step in creating PWA. Sign In to your apex account, at the dashboard page you will several action buttons.

Click at App Builder button which it will direct you to a new page where you will create a new application. Click Create

Here you will be directed to a new page called create application.


Click New Application, head over to this page where you highlight the details of your application and set Progressive Web Application (PWA) feature.


After the application has been created it will have all the necessary features to allow a user to install the application in their device.

Enable Progressive Web Application Feature

In the App Builder tab in your browser, click your application, then click Edit Application Definition on your application home page.

  1. Click on Progressive Web App.
  2. Enable Progressive Web App.

Test and install the PWA

To test your PWA, you need to run your application in a browser that supports PWAs, such as Chrome, Edge, Firefox, or Safari. You can also use a mobile device or an emulator to test your PWA.

To test your PWA:

  • Navigate to App Builder => Your Application => Run Application.
  • Log in to your application if prompted.
  • Observe how your application behaves and looks like a native app.
  • If your browser supports PWAs, you should see a prompt or an icon to install your PWA to the home screen. For example, in Chrome, you should see a + icon in the address bar. In Safari, you should see a Share icon and then an Add to Home Screen option.
  • Click the prompt or the icon to install your PWA to the home screen.
  • Follow the instructions to complete the installation.

To install your PWA:

  • Go to the home screen of your device and look for the icon of your PWA.
  • Tap the icon to launch your PWA.
  • Enjoy using your PWA offline, with push notifications, and without any browser UI.

In this blog post, I showed you how to set up a PWA in Oracle APEX. You can use this feature to create web applications that offer a native app experience to your users. I hope this was helpful and informative.

Categories
Oracle APEX

Oracle Apex Sandbox Creation

Used these links to create base resources on Cloud Tenancy:
https://docs.oracle.com/en-us/iaas/Content/GSG/Concepts/settinguptenancy.htm
https://docs.oracle.com/en-us/iaas/Content/GSG/Tasks/addingusers.htm#Create

Login to – https://www.oracle.com/cloud/sign-in.html
Cloud Account Name:
User name:<XXXXXXX@email.com>
Password:

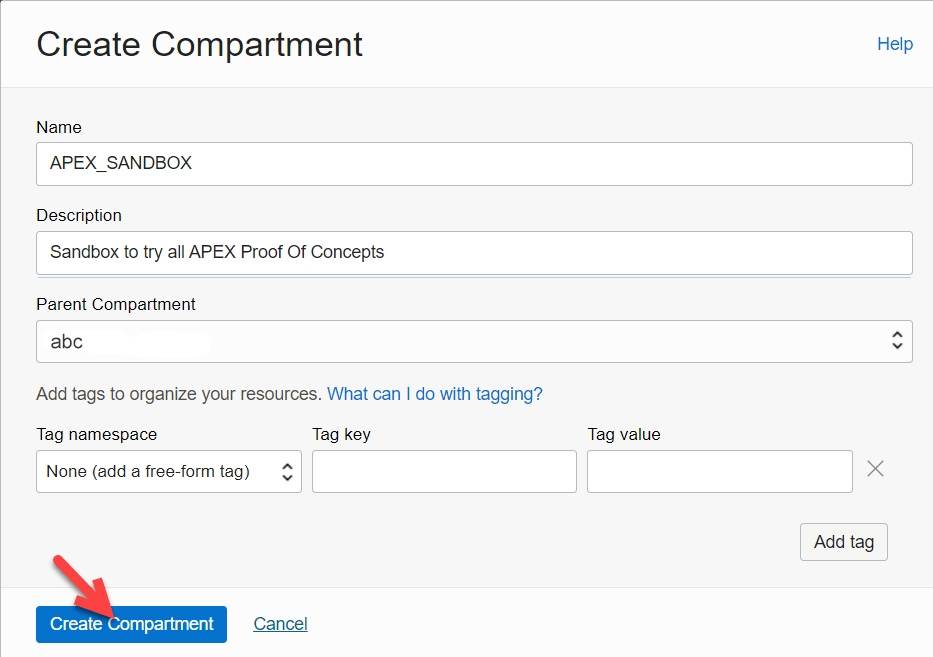
Create a new Compartment:
Main Navigation> Identity & Security> Identity> Compartment

Create Compartment with below details:
Name: APEX_SANDBOX
Description: Sandbox to try all APEX Proof Of Concepts
Parent Compartment: abc

Create a Sandbox Group: Main Navigation> Identity & Security> Identity> Groups
Name: APEX_SANDBOX_GROUP
Description: Sandbox Group to try all APEX Proof Of Concepts

Below is screen after group is created:

Create a new User: Main Navigation> Identity & Security> Identity> Users> Create user <XXXXXXXXXX) (email:XXX@email.com) Create a new Policy: Main Navigation> Identity & Security> Identity> Policies> Create Policy
Name: APEX_SANDBOX_POLICY
Description: Sandbox Policy to try all APEX Proof Of Concepts
Parent Compartment: APEX_SANDBOX

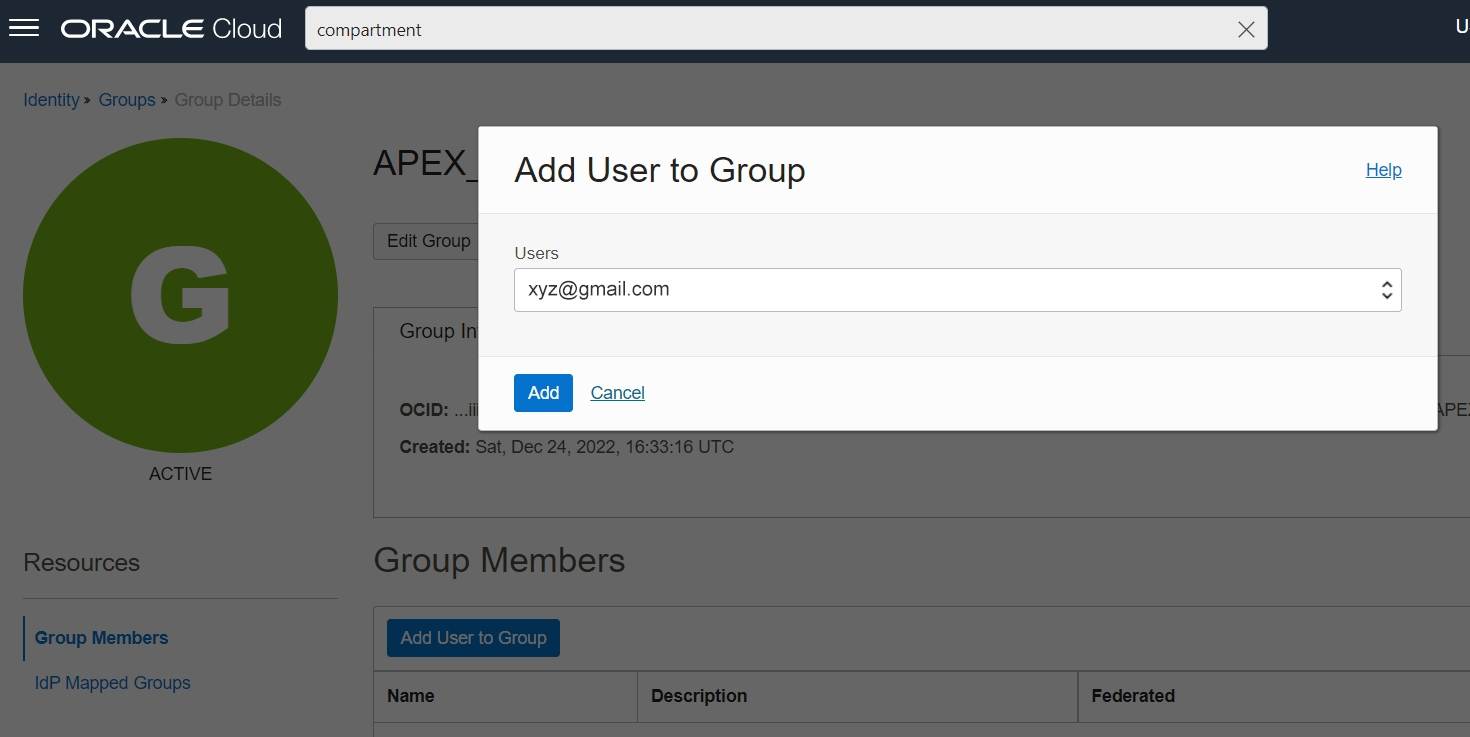
Add User to a Group:

Categories
Oracle APEX

Oracle Apex Setup and Administration

Login to cloud tenancy>Quickstarts> Application Development:

You will be directed to screen below and click ‘Continue’

Compartment: APEX_SANDBOX
Password:

Below is the screen after deployment is completed:

Click on Launch APEX to setup workspace and user accounts: Use the ADMIN password created earlier

After logging in create a work space with new schema for the first time:
Workspace Name:ABC_WS
Workspace Username: abcd_dev
Workspace Password:

Below is the screen after the workspace is created:

Logout as admin and login back directly to the workspace as its user with below details:
Workspace Name:ABC_WS
Workspace Username: abcd_dev
Workspace Password:

After logging in import,any sample apps from https://oracle.github.io/apex/ to create new application with below details:

Create a new application using the ‘New Application’ choice shown below: