Beejartha

Categories
Node & React Js

Integrating India’s UPI API with Node.js: A Comprehensive Guide

In the ever-evolving landscape of digital payments, India’s Unified Payments Interface (UPI) stands out as a revolutionary system. Launched by the National Payments Corporation of India (NPCI), UPI has transformed the way transactions are conducted in India, providing a seamless and secure platform for both users and businesses.

For developers and businesses looking to leverage UPI for payment processing, integrating UPI with your application can open doors to a vast market. In this blog post, we’ll explore what UPI is, and guide you through the process of integrating UPI with a Node.js application using the UPI API.

What is UPI?

UPI is a real-time payment system that facilitates instant money transfers between banks through mobile devices. It simplifies transactions by linking multiple bank accounts to a single mobile application and allows for easy and quick payments with just a few taps. UPI supports a range of transactions including bill payments, peer-to-peer transfers, and merchant payments.

Benefits of UPI Integration

  1. Seamless Transactions: UPI transactions are instantaneous and can be completed 24/7, including on holidays.
  2. Cost-Effective: UPI transactions typically incur lower costs compared to traditional banking methods.
  3. User-Friendly: UPI provides a straightforward and easy-to-use interface for users, enhancing their overall experience.
  4. Security: UPI transactions are encrypted and include multiple layers of security to protect users.

Integrating UPI with Node.js

To integrate UPI with a Node.js application, you’ll need to follow these steps:

Step 1: Set Up Your Development Environment

Before starting the integration process, ensure you have Node.js and npm (Node Package Manager) installed. If not, download and install them from the official Node.js website.

Step 2: Choose a UPI Service Provider

UPI integration is typically done through third-party service providers or payment gateways that offer UPI services. Some popular providers include Razorpay, Paytm, and PhonePe. For this guide, we’ll use Razorpay as an example. Sign up for a Razorpay account and obtain your API key and secret.

Step 3: Install Necessary Packages

First, create a new Node.js project or navigate to your existing project directory. Install the razorpay package using npm:

npm install razorpay

Step 4: Initialize Razorpay in Your Node.js Application

Create a new file, upi Integration.js, and initialize Razorpay with your API credentials:

const Razorpay = require('razorpay');
const razorpay = new Razorpay({
key_id: 'YOUR_RAZORPAY_KEY_ID',
key_secret: 'YOUR_RAZORPAY_KEY_SECRET',
});

Step 5: Create a Payment Order

To initiate a UPI payment, you need to create a payment order. This involves specifying the amount, currency, and payment method. Here’s an example of how to create an order:

const createOrder = async () => {
try {
const order = await razorpay.orders.create({
amount: 50000, // Amount in paise (50000 paise = ₹500)
currency: 'INR',
payment_capture: 1, // 1 to capture payment automatically, 0 otherwise
});
return order;
} catch (error) {
console.error('Error creating order:', error);
throw error;
}
};
createOrder().then(order => {
console.log('Order created:', order);
});

Step 6: Implement UPI Payment Gateway

Once the order is created, you need to redirect the user to the UPI payment gateway. This step involves using Razorpay’s payment link or integrating their frontend SDK. Here’s a basic example of how you might create a payment link:

const generatePaymentLink = async (orderId) => {
const paymentLink = `https://api.razorpay.com/v1/checkout/1?order_id=${orderId}`;
return paymentLink;
};
createOrder().then(order => {
generatePaymentLink(order.id).then(link => {
console.log('Payment link:', link);
});
});

Step 7: Handle Payment Confirmation

After the user completes the payment, Razorpay will send a callback to your server with payment details. Implement a webhook to handle payment confirmation:

const express = require('express');
const bodyParser = require('body-parser');
const crypto = require('crypto');
const app = express();
app.use(bodyParser.json());
const webhookSecret = 'YOUR_WEBHOOK_SECRET';
app.post('/webhook', (req, res) => {
const hmac = crypto.createHmac('sha256', webhookSecret);
const sig = hmac.update(JSON.stringify(req.body)).digest('hex');
if (sig === req.headers['x-razorpay-signature']) {
// Payment verified
console.log('Payment details:', req.body);
res.status(200).send('Success');
} else {
// Payment verification failed
res.status(400).send('Invalid signature');
}
});
app.listen(3000, () => {
console.log('Server running on port 3000');
});

Step 8: Testing and Deployment

Thoroughly test your UPI integration using Razorpay’s test mode or sandbox environment. Ensure that you handle different payment scenarios, such as successful payments, failed payments, and refunds.
Once testing is complete, deploy your application to a production environment and switch to Razorpay’s live credentials.

Conclusion

Integrating UPI with your Node.js application can significantly enhance the payment experience for your users. By leveraging UPI’s seamless and secure transaction capabilities, you can streamline payment processes and tap into India’s vast market. With the steps outlined in this guide, you should be well on your way to implementing UPI in your Node.js application.

Happy coding and may your payment integration be smooth and successful! If you have any questions or run into issues, feel free to ask in the comments below.

Categories
Node & React Js

Security Best Practices for Node.js Applications

Node.js is widely used for developing web applications because of its efficiency and scalability. As its popularity increases, it is important to prioritize security measures to safeguard applications from potential risks. Below are key recommendations for enhancing the security of Node.js applications:

Input Validation

It is crucial to consistently verify user input in order to safeguard your application against harmful data that may result in security risks like SQL injection, cross-site scripting (XSS), and remote code execution. Employ reliable validation tools such as `express-validator` to assess the type, length, format, and scope of input data

Authentication

Implement robust authentication mechanisms. Explore the utilization of OAuth or JSON Web Tokens (JWT) for stateless authentication. Guarantee the secure storage of passwords by employing salted hashing algorithms such as bcrypt.

Authorization

Implement stringent authorization checks to guarantee that users can only access resources for which they have explicit permission. Employ middleware to effectively handle roles and permissions, and refrain from solely relying on client-side checks.

Security Headers

Enhance security by leveraging HTTP headers. Utilize tools such as Helmet to configure different HTTP headers in order to safeguard against threats like clickjacking, XSS, and other forms of code injection attacks.

Dependency Management

Ensure that all dependencies are kept up to date and conduct regular checks for vulnerabilities by utilizing tools such as npm audit or Snyk. Eliminate any unused dependencies in order to minimize the attack surface.

Session Management

Utilize secure, HTTP-only cookies for managing sessions in order to mitigate XSS attacks. Ensure appropriate session expiration settings and explore the option of employing session stores that are resilient against session fixation.

Error Handling

Ensure errors are managed appropriately by avoiding the disclosure of stack traces or confidential application information to users. Utilize logging frameworks to document errors for tracking purposes, all the while presenting users with generic error notifications.

Rate Limiting

Implement rate limiting on vulnerable routes, such as login routes, to safeguard your application from brute-force attacks.

Data Protection

Sensitive data should be encrypted during transmission by utilizing TLS and while at rest by employing suitable encryption techniques. It is crucial to ensure that backups are also encrypted to maintain the security of the information.

Logging and Monitoring

Utilize logging to document user actions and system events. Employ monitoring tools to detect any abnormal activities that may signal a security breach.

Protection Against Common Vulnerabilities

Stay informed about prevalent security weaknesses outlined by OWASP, including injection attacks, broken authentication, exposure of sensitive data, and others. Consistently assess and evaluate your application to identify and address these vulnerabilities.

Conclusion

Adhering to these security guidelines can greatly minimize the chances of vulnerabilities in Node.js applications and safeguard valuable data and assets. It is crucial to stay updated on the newest security risks and consistently incorporate security measures throughout the development process.

Categories
Node & React Js

Harnessing the Power of NoSQL Databases in Node.js Applications

In the constantly changing realm of database technologies, NoSQL databases have risen as robust substitutes for conventional relational databases, providing unmatched scalability, adaptability, and efficiency. This extensive manual will delve into how Node.js developers can utilize NoSQL databases such as MongoDB and Redis to create high-performing applications. We will discuss a wide range of topics, from fundamental CRUD operations to sophisticated data modeling and techniques for optimizing performance.

Understanding NoSQL Databases

NoSQL databases are specifically crafted to manage extensive amounts of unstructured or semi-structured data, which makes them perfect for contemporary web applications that handle various data formats and high-throughput tasks. In contrast to relational databases that utilize structured query language (SQL) for data handling, NoSQL databases utilize adaptable data models and query languages customized for particular scenarios.

Choosing the Right NoSQL Database

Various NoSQL databases are available, each tailored for specific data storage and retrieval needs. The top two types include document-oriented databases such as MongoDB and key-value stores like Redis. When selecting a NoSQL database for your Node.js application, take into account factors like data organization, query intricacy, scalability demands, and consistency assurances.

Working with MongoDB in Node.js

MongoDB is a popular NoSQL database that utilizes a document-oriented approach, offering a flexible data model, powerful query features, and the ability to scale horizontally. When working with MongoDB in Node.js applications, developers commonly rely on the official MongoDB Node.js driver or well-known Object-Document Mapping (ODM) libraries such as Mongoose.

This section will delve into:

  • Connecting to a MongoDB database from a Node.js application.
  • Performing CRUD (Create, Read, Update, Delete) operations on MongoDB collections.
  • Defining schemas and models using Mongoose for data validation and abstraction.
  • Executing complex queries using MongoDB’s aggregation framework
  • Best practices for indexing, sharding, and optimizing MongoDB performance

Working with Redis in Node.js

Redis is a high-speed in-memory key-value store recognized for its exceptional performance, data structures, and ability to support advanced functionalities such as pub/sub messaging and caching. When working with Node.js applications, developers have the option to engage with Redis through the official Redis client or through high-level libraries like in redis.

In this segment, we will discuss:

  • Establishing a connection to a Redis server from a Node.js application.
  • Executing fundamental operations like SET, GET, and DEL for key-value storage.
  • Utilizing Redis data structures such as lists, sets, and hashes for sophisticated data manipulation.
  • Implementing caching techniques with Redis to enhance application performance.
  • Harnessing Redis pub/sub messaging for instantaneous communication among components.

Data Modeling and Performance Optimization

Effective data modeling is crucial for maximizing the performance and scalability of No SQL databases in Node.js applications. In this section, we’ll discuss strategies for designing schemas, denormalizing data, and optimizing queries to achieve optimal performance. Key topics include:

  • Designing efficient document schemas for MongoDB collections
  • Denormalizing data to reduce query complexity and improve read performance.
  • Implementing indexing and query optimization techniques for both MongoDB and Redis.
  • Utilizing caching and data partitioning strategies to distribute load and improve scalability

Conclusion

NoSQL databases such as MongoDB and Redis provide Node.js developers with a robust toolkit to create high-performance, scalable, and adaptable applications. By mastering the basics of NoSQL databases, including CRUD operations, data modeling, and performance optimization strategies, developers can fully utilize these technologies to deliver efficient and reliable solutions that cater to the requirements of modern web applications.

In essence, integrating NoSQL databases into Node.js applications unlocks a plethora of opportunities for constructing data-centric, real-time, and scalable systems. Whether you are developing a social networking platform, an online store, or a live analytics dashboard, NoSQL databases offer the versatility and efficiency necessary to excel in today’s dynamic digital environment.

Categories
Node & React Js

Mastering Deployment Strategies for Node.js Applications

In the rapidly evolving realm of software development, ensuring efficient and dependable deployment of Node.js applications in production environments is crucial for achieving success. With a multitude of deployment options at hand, selecting the most suitable strategy can be overwhelming. Within this extensive guide, we will delve into diverse deployment strategies for Node.js applications, encompassing containerization through Docker, deployment on cloud platforms such as AWS and Heroku, and the implementation of continuous integration/continuous deployment (CI/CD) pipelines

Understanding Deployment Strategies

Before diving into specific deployment methods, let’s briefly discuss the goals and considerations of deploying Node.js applications. The primary objectives include:

  1. Reliability: Ensuring that deployed applications are stable, performant, and resilient to failures.
  2. Scalability: Ability to scale applications horizontally or vertically to handle increased traffic and load.
  3. Automation: Streamlining deployment processes to minimize manual intervention and human error
  4. Maintainability: Simplifying maintenance tasks such as updates, rollbacks, and monitoring.

With these goals in mind, let’s explore the deployment strategies available for Node.js applications.

Containerization with Docker

Containerization has revolutionized software deployment by packaging applications and their dependencies into lightweight, portable containers. Docker, the leading containerization platform, offers several benefits for deploying Node.js applications:

  1. Consistency: Docker ensures consistent environments across development, testing, and production, reducing the risk of “it works on my machine” issues.
  2. Isolation: Containers provide isolation for applications, preventing conflicts between dependencies and allowing for easy versioning
  3. Automation: Docker enables easy scaling of Node.js applications using container orchestration tools like Kubernetes or Docker Swarm

To deploy a Node.js application with Docker, developers create a Dockerfile specifying the application’s dependencies and runtime environment. They then build a Docker image and deploy it to a container orchestration platform or a Docker host.

Deployment to Cloud Platforms

Cloud platforms such as AWS (Amazon Web Services) and Heroku offer convenient and scalable environments for deploying Node.js applications. Key benefits of deploying to cloud platforms include:

  1. Infrastructure Management: Cloud platforms abstract away infrastructure management tasks, allowing developers to focus on application development.
  2. Scalability: Cloud platforms provide auto-scaling capabilities, ensuring applications can handle fluctuating traffic and load.
  3. Managed Services: Cloud platforms offer a wide range of managed services, including databases, caching, and monitoring, simplifying application development and maintenance.

To deploy a Node.js application to AWS, developers can use services like AWS Elastic Beanstalk, AWS Lambda, or EC2 instances. Similarly, deploying to Heroku involves pushing code to a Git repository and letting Heroku handle the rest, including building, deploying, and scaling the application.

Continuous Integration/Continuous Deployment (CI/CD) Pipelines

CI/CD pipelines automate the process of building, testing, and deploying applications, enabling rapid and reliable releases. By integrating CI/CD into the development workflow, developers can:

  1. Automate Deployment: CI/CD pipelines automate the deployment process, reducing manual intervention and human error.
  2. Ensure Consistency: CI/CD pipelines ensure consistent deployment environments and configurations across development, testing, and production
  3. Enable Continuous Delivery: CI/CD pipelines enable continuous delivery, allowing developers to release updates to production quickly and frequently.

Popular CI/CD tools such as Jenkins, CircleCI, and GitLab CI/CD integrate seamlessly with Node.js applications. Developers define pipeline configurations specifying build, test, and deployment stages, and the CI/CD tool executes these stages automatically whenever changes are pushed to the code repository.

Conclusion

Deploying Node.js applications in production environments necessitates thorough planning and consideration of various factors like reliability, scalability, automation, and maintainability. Utilizing deployment techniques such as Docker containerization, cloud platform deployment on AWS and Heroku, and CI/CD pipelines, developers can simplify the deployment process, reduce downtime, and efficiently deliver top-notch applications to users.

In essence, mastering deployment strategies for Node.js applications is crucial for contemporary software development practices, empowering developers to swiftly, reliably, and extensively deploy applications. Whether opting for Docker, cloud platforms, CI/CD pipelines, or a blend of these methods, the key lies in emphasizing automation, consistency, and scalability to guarantee successful deployments and contented end-users.

Categories
Node & React Js

ReactJS CRUD Application

In this blog post, I will show you how to build a simple to-do application using React.js. React.js is a popular JavaScript library for creating user interfaces with reusable components. You will learn how to use React hooks, state management, and event handling to create a functional and interactive app.
The app will have the following features:
– Display a list of tasks that the user can add, edit, delete, or mark as completed.
– Filter the tasks by all, active, or completed status.
– Store the tasks in our local storage so that they persist across sessions. To do that we are going to use a package called json-server that’s going to create a localized database.
To follow along, you will need some basic knowledge of HTML, CSS, and JavaScript, as well as Node.js and npm installed on your machine. You will also need a code editor of your choice.
Let’s get started by creating a new React project using the create-react-app tool:
First you need to create a react application. You do this by adding this bash script to your terminal;

npx create-react-app react-todo

This will create a new folder called react-todo with all the necessary files and dependencies for a React app. Navigate to the project folder and start the development server:

cd react-todo
npm start

You should see a default React app running on http://localhost:3000 in your browser.
Next, let’s clean up some of the files that we don’t need for this project. Open the src folder and delete the following files:

- App.test.js
- index.css
- logo.svg
- reportWebVitals.js
- setupTests.js

Also, remove the corresponding import statements from App.js and index.js.
Add the following packages to use in the application.


yarn add moment node-sass redux redux-thunk uuid react-loading
Yarn add -D autoprefixer json-server concurrently postcss postcss-cli tailwindcss sass

Now, let’s add some basic styling to our app. At style.css in the src folder and paste the following code:


@tailwind base;
@tailwind components;
@tailwind utilities;
@layer base {
:root {
--primary-color: #17a2b8;
--dark-color: #343a40;
--light-color: #f4f4f4;
--danger-color: #dc3545;
--success-color: #28a745;
}
html {
font-size: 12px;
-webkit-tap-highlight-color: rgba(0, 0, 0, 0);
-webkit-text-size-adjust: 100%;
-ms-text-size-adjust: 100%;
}
body {
margin: 0;
padding: 0;
font-family: "Open Sans", sans-serif;
-webkit-font-smoothing: antialiased;
-moz-osx-font-smoothing: grayscale;
overflow-x: hidden;
overflow-y: auto;
color: #333;
}
ul {
list-style-type: none;
}
a {
text-decoration: none;
}
h1 {
@apply text-2xl;
}
h2 {
@apply text-xl;
}

This will add some basic styles to our app components. Don’t forget to import


import './App.css';

Now that we have set up our project and added some styles, let’s start building our React components. In the src folder lets create these folders and files


-Actions
Alert.js
Todo.js
-Components
AddTodo.js
Alert.js
EditTodo.js
Footer.js
Todo.js
NavBar.js
-Reducers
Alert.js
Index.js
Todo.js
-Constants
Types.js
App.js
Index.js
store.js

Lets create our action types that we are going to use in this project. At types.js add these;


export const SET_ALERT = "SET_ALERT";
export const REMOVE_ALERT = "REMOVE_ALERT";
export const ADD_TODO = "ADD_TODO";
export const GET_TODO = "GET_TODO";
export const DELETE_TODO = "DELETE_TODO";
export const UPDATE_TODO = "UPDATE_TODO";
export const CLEAR_TODO = "CLEAR_TODO";
export const SEARCH_TODO = "SEARCH_TODO";
export const TODO_ERROR = "TODO_ERROR";
export const SET_CURRENT = "SET_CURRENT";
export const CLEAR_CURRENT = "CLEAR_CURRENT";
export const SET_LOADING = "SET_LOADING";

In our reducers folder at todo.js file you created lets use our action types to manage all states that are going to be used for our to-do application. Also not forgeting to import our action types that we are going to use in our switch case statement. Write the following code:


import {
ADD_TODO,
UPDATE_TODO,
CLEAR_TODO,
CLEAR_CURRENT,
GET_TODO,
SEARCH_TODO,
SET_CURRENT,
SET_LOADING,
TODO_ERROR,
DELETE_TODO,
} from "../constants/types";
const initialState = {
todos: null,
current: null,
loading: false,
error: null,
};
export default (state = initialState, action) => {
const { type, payload } = action;
switch (type) {
case GET_TODO:
return {
...state,
todos: payload,
loading: false,
};
case ADD_TODO:
return {
...state,
todos: [...state.todos, payload],
loading: false,
};
case UPDATE_TODO:
return {
...state,
todos: state.todos.map((todo) =>
todo.id === payload.id ? payload : todo
),
};
case DELETE_TODO:
return {
...state,
todos: state.todos.filter((todo) => todo.id !== payload),
loading: false,
};
case SEARCH_TODO:
return {
...state,
todos: payload,
};
case SET_CURRENT:
return {
...state,
current: payload,
};
case CLEAR_CURRENT:
return {
...state,
current: null,
};
case SET_LOADING:
return {
...state,
loading: true,
};
case TODO_ERROR:
console.error(payload);
return {
...state,
error: payload,
};
default:
return state;
}
};

At alert.js in reducers folder write the following code:


import { SET_ALERT, REMOVE_ALERT } from "../constants/types";
const initialState = [];
export default function (state = initialState, action) {
const { type, payload } = action;
switch (type) {
case SET_ALERT:
return [...state, payload];
case REMOVE_ALERT:
return state.filter((alert) => alert.id !== payload);
default:
return state;
}
}

Then we need to combine all the reducers created. Here it is best we use one of redux’s methods:

CombineReducer


import { combineReducers } from "redux";

This is going to combine all the reducers created so that all the states can be recognized in our application through store.

Since i’ve mentioned a store, let me explain what it’s functionality;
A Store in Redux is like a placeholder for all the states, and states mutations. If any change of state occurs in our application the store will recognize it and stores. Lets continue;
Create a file index.js and write the code below;


import { combineReducers } from "redux";
import alert from "./alert";
import todo from "./todo";
export default combineReducers({
todo,
alert,
});


Redux Core principles

Lets make our Actions, Actions in redux are responsible for state change. This is done by emitting or dispatch an action. Create a file called alert.js write the code below;


import { v4 as uuidv4 } from "uuid";
import { SET_ALERT, REMOVE_ALERT } from "../constants/types";
export const setAlert = (msg, alertType, timeout = 3000) => (dispatch) => {
const id = uuidv4();
dispatch({
type: SET_ALERT,
payload: { msg, alertType, id },
});
setTimeout(() => dispatch({ type: REMOVE_ALERT, payload: id }), timeout);
};

The above code will be responsible for managing alert notification action. Also note we’ve used a package called uuid. This will set unique ID identifiers for every alert shown in our application. Next Create a file called todo.js.

Todo.js


import { setAlert } from "./alert";
import {
ADD_TODO,
UPDATE_TODO,
CLEAR_TODO,
CLEAR_CURRENT,
GET_TODO,
SEARCH_TODO,
SET_CURRENT,
SET_LOADING,
TODO_ERROR,
DELETE_TODO,
} from "../constants/types";
//ADD TODO
export const addTodo = (todo) => async (dispatch) => {
try {
setLoading();
const res = await fetch("/todos", {
method: "POST",
body: JSON.stringify(todo),
headers: { "Content-Type": "application/json" },
});
const data = await res.json();
dispatch({
type: ADD_TODO,
payload: data,
});
} catch (err) {
dispatch({
type: TODO_ERROR,
payload: err.response.statusText,
});
}
};
//GET TODO
export const getTodo = () => async (dispatch) => {
try {
setLoading();
const res = await fetch("/todos");
const data = await res.json();
dispatch({
type: GET_TODO,
payload: data,
});
} catch (err) {
dispatch({
type: TODO_ERROR,
payload: err.response.statusText,
});
}
};
//UPDATE TODO
export const updateTodo = (todo) => async (dispatch) => {
try {
setLoading();
const res = await fetch(`/todos/${todo.id}`, {
method: "PUT",
body: JSON.stringify(todo),
headers: {
"Content-Type": "application/json",
},
});
const data = await res.json();
dispatch({
type: UPDATE_TODO,
payload: data,
});
} catch (err) {
dispatch({
type: TODO_ERROR,
payload: err.response.statusText,
});
}
};
//DELETE TODO
export const deleteTodo = (id) => async (dispatch) => {
try {
setLoading();
await fetch(`/todos/${id}`, {
method: "DELETE",
});
dispatch({
type: DELETE_TODO,
payload: id,
});
} catch (err) {
dispatch({
type: TODO_ERROR,
payload: err.response.statusText,
});
}
};
//SEARCH TODO
export const searchTodo = (text) => async (dispatch) => {
try {
setLoading();
const res = await fetch(`/todos?q=${text}`);
const data = await res.json();
dispatch({
type: SEARCH_TODO,
payload: data,
});
} catch (err) {
dispatch({
type: TODO_ERROR,
payload: err.response.statusText,
});
}
};
//SET LOADING
export const setLoading = () => {
return {
type: SET_LOADING,
};
};
//SET CURRENT TODO
export const setCurrent = (todo) => {
return {
type: SET_CURRENT,
payload: todo,
};
};
//CLEAR CURRENT TODO
export const clearCurrent = () => {
return {
type: CLEAR_CURRENT,
};
};

This file will manage all of our to-do action requests, i.e. Creation, Deletion, Update and Reading of our To-do applications. You can note how we are reusing the same action types used in our reducers.
Now lets create our components that we are going to use in our application.

AddTodo.js

This is responsible for the creation of our task, We’ll trigger addTodo action, to create our application.


import React, { useState } from "react";
import { connect } from "react-redux";
import { addTodo } from "../actions/todo";
import { setAlert } from "../actions/alert";
const required = (value) => {
if (!value) { return
This field is required!;}};
const AddTodo = ({ addTodo, setAlert }) => {
const [message, setMessage] = useState("");
const onSubmit = (e) => {
e.preventDefault();
if (message === "" || null) {
setAlert("This field is required!", "danger");
} else {
const newTodo = {
message,
date: new Date(),
};
addTodo(newTodo);
setAlert("Item successfully added", "success");
setMessage("");
}
};
return (
<section readonly className="mx-auto flex w-full max-w-7xl flex-col gap-2 rounded-md bg-white px-4 py-2 shadow-md transition-all duration-300 hover:scale-105 hover:border-l-2 hover:border-r-2 hover:border-solid hover:border-green-500">
<h1 readonly className="my-2 text-xl font-bold">Add</h1> <div readonly className="w-full"> <input readonly type="text" name="message" placeholder="Add Task" value={message} onChange={(e) => setMessage(e.target.value)}
className={`h-10 w-full rounded-md px-4 py-2 text-gray-800 ring-1 ring-gray-200 focus:border-gray-300 focus:outline-none focus:ring-1 focus:ring-gray-300 `}
/>
</div>
<div className="flex-end flex justify-end">
<button
type="submit"
form="add-todo"
onClick={onSubmit}
className={`flex h-10 w-20 items-center justify-center rounded-md bg-green-500 px-4 py-3 font-semibold text-white duration-200 ease-in hover:scale-105 hover:cursor-pointer `}
disabled={message === ""}
>
Add
</button>
</div>
</section>
);
};
export default connect(null, { setAlert, addTodo })(AddTodo);

Alert.js

This is going to manage all of our alert being triggered.


import React from "react";
import PropTypes from "prop-types";
import { connect } from "react-redux";
const Alert = ({ alerts }) =>
alerts !== null &&
alerts.length > 0 &&
alerts.map((alert) => (
<div
key={alert.id}
className={`alert absolute right-4 top-0 z-50 rounded-md alert-${alert.alertType}`}
>
{alert.msg}
</div>
));
Alert.propTypes = {
alerts: PropTypes.array.isRequired,
};
const mapStateToProps = (state) => ({
alerts: state.alert,
});
export default connect(mapStateToProps)(Alert);

EditTodo.js

This is responsible for updating any item created in our list.


import React, { useState, useEffect } from "react";
import { connect } from "react-redux";
import { setAlert } from "../actions/alert";
import { updateTodo } from "../actions/todo";
const required = (value) => {
if (!value) {
return <p className="text-danger">This field is required!</p>;
}
};
const EditTodo = ({ current, updateTodo, setAlert }) => {
const [message, setMessage] = useState("");
const [attention, setAttention] = useState(false);
useEffect(() => {
if (current) {
setMessage(current.message);
setAttention(current.attention);
}
}, [current]);
const Clear = () => {
setMessage("");
setAttention(false);
};
const onSubmit = (e) => {
e.preventDefault();
if (message === "") {
setAlert("This field is required!", "danger");
} else {
const editTodo = {
id: current.id,
message,
attention,
date: new Date(),
};
updateTodo(editTodo);
setAlert(`${message} Updated Successfully`, "success");
setMessage("");
setAttention(false);
}
};
return (
<section
className={`mx-auto flex w-full max-w-7xl flex-col gap-2 rounded-md bg-white px-4 py-2 shadow-md transition-all duration-300 hover:scale-105 hover:border-l-2 hover:border-r-2 hover:border-solid hover:border-blue-400 ${
message
? " scale-105 border-l-2 border-r-2 border-solid border-blue-400 transition-all duration-300"
: "transition-all duration-300"
}`}
>
<h1 className="text-xl font-bold">Edit </h1>
<div className="w-full">
<input
type="text"
name="message"
placeholder="Edit Task"
value={message}
onChange={(e) => setMessage(e.target.value)}
className={`h-10 w-full rounded-md px-4 py-2 text-gray-800 ring-1 ring-gray-200 focus:border-gray-300 focus:outline-none focus:ring-1 focus:ring-gray-300 `}
/>
</div>
<div className="flex-end flex items-center justify-between">
<label className="flex items-center space-x-2 font-medium text-gray-600">
<input
type="checkbox"
className="filled-in"
checked={attention}
value={attention}
onChange={(e) => setAttention(!attention)}
/>{" "}
<span>Check</span>
</label>
<div className="flex items-center space-x-2">
<button
type="button"
onClick={Clear}
className={`flex h-10 w-full items-center justify-center rounded-md bg-red-300 px-4 py-3 font-semibold text-white duration-200 ease-in hover:scale-105 hover:cursor-pointer `}
>
Cancel
</button>
<button
type="submit"
form="add-todo"
onClick={onSubmit}
className={`flex h-10 w-full items-center justify-center rounded-md bg-cyan-400 px-4 py-3 font-semibold text-white duration-200 ease-in hover:scale-105 hover:cursor-pointer `}
>
Submit
</button>
</div>
</div>
</section>
);
};
const mapStateToProps = (state) => ({
current: state.todo.current,
});
export default connect(mapStateToProps, { setAlert, updateTodo })(EditTodo);

Todo.js

This is responsible for showing all items in our list and filtering any item available.


import React, { useEffect, useRef } from "react";
import PropTypes from "prop-types";
import { connect } from "react-redux";
import Moment from "react-moment";
import moment from "moment";
import { setAlert } from "../actions/alert";
import { getTodo, deleteTodo, setCurrent, searchTodo } from "../actions/todo";
import ReactLoading from "react-loading";
const Loading = () => ;
const Todo = ({
getTodo,
setAlert,
searchTodo,
deleteTodo,
setCurrent,
todo: { todos, loading },
}) => {
const text = useRef("");
useEffect(() => {
getTodo();
}, []);
const onChange = (e) => {
searchTodo(text.current.value);
};
const OnDelete = async (todo) => {
deleteTodo(todo.id);
setAlert("Item Removed", "success");
};
if (loading || todos === null) {
return (
<div className="loading mx-auto w-full">
<Loading />
</div>
);
}
return (
<div>
<div className="mx-auto w-full max-w-7xl rounded-lg border border-gray-200 bg-white shadow-lg">
<header className="flex w-full items-center justify-between border-b border-gray-100 px-5 py-4">
<h2 className="font-semibold text-gray-800">Task(s)</h2>
<section className="flex w-full max-w-lg flex-row space-x-2">
<button
title="refresh"
type="button"
onClick={getTodo}
className="items-center rounded-md bg-gray-400 px-3 py-2 font-semibold text-white"
><i className="fas fa-sync-alt"/>
</button>
<div className="w-full">
<input
id="search"
type="search"
placeholder="Search..."
ref={text}
onChange={onChange}
className={`h-10 w-full rounded-md px-4 py-2 text-gray-800 ring-1 ring-gray-200 focus:border-gray-300 focus:outline-none focus:ring-1 focus:ring-gray-300 `}
/>
</div>
</section>
</header>
<div className="p-3">
<div className="overflow-x-auto">
{!loading && todos.length <= 0 ? ( <p className="mx-auto flex w-full max-w-lg flex-col text-lg font-bold text-blue-400"> Task list is empty, please add some info </p> ) : ( <table className="table w-full table-auto"> <thead className="bg-gray-100 text-base font-semibold uppercase leading-normal text-gray-400"> <tr><th className="whitespace-nowrap p-2"> <div className="text-left font-semibold">#</div>
</th>
<th className="whitespace-nowrap p-2">
<div className="text-left font-semibold">To-Do</div>
</th>
<th className="whitespace-nowrap p-2">
<div className="text-left font-semibold">Time</div>
</th>
<th className="whitespace-nowrap p-2">
<div className="text-left font-semibold">Action</div>
</th>
</tr>
</thead>
{todos.map((todo) => (
<tbody className=" font-light text-gray-600">
<tr className="border-b border-gray-200 hover:bg-gray-50">
<td className="whitespace-nowrap p-2">
<div className="text-left">{todo.id}</div>
</td>
<td className="whitespace-nowrap p-2">
<div
className={`text text-left ${
todo.attention
? "text-success line-through"
: "text-gray-600 "
}`}
>
{todo.message}
</div>
</td>
<td className="whitespace-nowrap p-2">
<div
className={`text text-left ${
todo.attention
? "text-success line-through"
: "text-gray-600 "
}`}
>
<Moment format="DD-MMM-YYYY hh:mm a">
{moment.utc(todo.date)}
</Moment>
</div>
</td>
<td className="whitespace-nowrap p-2">
<div className="flex items-center gap-2 text-left">
<button
title="Edit"
type="button"
onClick={() => setCurrent(todo)}
className="items-center rounded-md bg-cyan-400 px-3 py-3 font-semibold text-white"
>
<i className="fa fa-edit" />
</button>
<button
title="Delete"
type="button"
onClick={() => OnDelete(todo)}
className="items-center rounded-md bg-red-300 px-3 py-3 font-semibold text-white"
>
<i className="fa fa-trash" />
</button>
</div>
</td>
</tr>
</tbody>
))}
</table>
)}
</div>
</div>
</div>
</div>
);
};
Todo.propTypes = {
getTodo: PropTypes.func.isRequired,
todo: PropTypes.object.isRequired,
};
const mapStateToProps = (state) => ({
todo: state.todo,
});
export default connect(mapStateToProps, {
getTodo,
setAlert,
deleteTodo,
setCurrent,
searchTodo,
})(Todo);

NavBar.js


import React from "react";
const NavBar = () => {
return (
<nav className="flex w-full flex-col bg-white px-6 py-4 text-center font-sans shadow sm:flex-row sm:items-baseline sm:justify-between sm:text-left">
<div className="mb-2 sm:mb-0">
<a href="/"className="text-grey-darkest hover:text-blue-dark text-2xl font-semibold no-underline">
To-Do Application
</a>
</div>
</nav>
);
};
export default NavBar;

Footer.js


import React from "react";
const Footer = () => {
return (
<footer className="absolute bottom-2 mt-10 flex flex-1 flex-col px-6 py-2">
<p className="themeText text-start text-lg font-normal md:text-left">
(c) {new Date().getFullYear()}{" "}
<a
href="/"
className={`text-xl font-normal text-cyan-600 hover:text-blue-600`}
rel="noreferrer"
>
To-do Application
</a>
</p>
</footer>
);
};
export default Footer;

App.js

Here we are going to import all of our components.


import React from "react";
import NavBar from "./components/NavBar";
import Footer from "./components/Footer";
import Alert from "./components/Alert";
import AddTodo from "./components/AddTodo";
import EditTodo from "./components/EditTodo";
import Todo from "./components/Todo";
function App() {
return (
<main className="relative mx-auto h-screen w-full bg-gray-100 ">
<NavBar />
<div
className={`flex w-full flex-1 flex-col gap-6 overflow-y-auto overflow-x-hidden px-4 py-4`}
>
<Alert />
<AddTodo />
<EditTodo />
<Todo />
</div>
<Footer />
</main>
);
}
export default App;

Index.js

And finally here we are going to wrap our App.js with one of redux methods tag called a Provider


import React from "react";
import ReactDOM from "react-dom";
import { Provider } from "react-redux";
import store from "./store";
import App from "./App";
import "./style.css";
// import "./style.output.css";
ReactDOM.render(
<Provider store={store}>
<App />
</Provider>,
document.getElementById("root")
);

Categories
Node & React Js

Build an USSD Savings Account Application with NodeJS & Express

Introduction

Many of you or probably some, I guess, have been met in a situation where your mobile phone application is not operational or it’s experiencing some down time. Most probably when you want to do a certain transaction operation. And for some reason you get SMS notification from the company e.g. “Banks/Insurance company etc.” that goes like this;

Dear Customer, we wish to inform you that we shall be undertaking a system maintenance on our App platform. Services will be unavailable from a certain time to a certain. Mean-while continue to access our services through our USSD platform. Dial *000*0#. We regret the inconvenience caused.

Well, in this tutorial I am going to take you through how to build a simple Cash Saving USSD Application with NodeJS. Although, it’s a bit challenging to come up with a USSD Application, because mainly you have to have a great logic behind it, especially when navigating through the menu. So basically USSD is a technology that allows users to access services without the need of an internet.

So here are the steps;

Getting Started

First, we have to create our project folder using our terminal:

mkdir ussd-cashSaving
cd ussd-cashSaving

Assuming you are using VScode, enter the following command to open the project folder.

code .

Next, we create the package.json file.

npm init -y

Adding .gitignore file to hide dependencies in node_modules folder

# dependencies
node_modules
node_modules/# misc
.env

Then we install the libraries;

npm install –save express ussd-builder bcryptjs dotenv nodemon lodash mongoose colors morgan

Note: nodemon package allows you to reload the server each time our code is modified.

In the root directory of the app, create the following files

  • USSD-CASHSAVING
  • └─── node_modules
  • └─── _data
    • └─── users.json
  • └─── config
    • └─── db.js
  • └─── controllers
    • └─── users.js
  • └─── menu
    • └─── dashboard.js
    • └─── index.js
    • └─── register.js
    • └─── savings.js
    • └─── sendMoney.js
    • └─── settings.js
    • └─── statements.js
  • └─── middleware
    • └─── async.js
    • └─── auth.js
    • └─── errors.js
  • └─── models
    • └─── Users.js
  • └─── routes
    • └─── users.js
  • └─── utils
    • └─── errorResponse.js
    • └─── sessionHandler.js
    • └─── url.js
  • └─── package.json
  • └─── package-lock.json
  • └─── server.js
  • └─── .env

At package.json file rename “main”: “index.js” to “main”: “server.js”

{
“name”: “ussd-cashsaving”,
“version”: “1.0.0”,
“description”: “”,
“main”: “server.js”,
“scripts”: {
“test”: “echo \”Error: no test specified\” && exit 1″,
“dev”: “nodemon server”,
},
“keywords”: [],
“author”: “”,
“license”: “ISC”,
“dependencies”: {
“bcryptjs”: “^2.4.3”,
“colors”: “^1.4.0”,
“dotenv”: “^16.0.3”,
“express”: “^4.18.2”,
“lodash”: “^4.17.21”,
“mongoose”: “^6.8.4”,
“morgan”: “^1.10.0”,
“nodemon”: “^2.0.20”,
“ussd-builder”: “^1.2.5”
}
}

Add a .env file;

NODE_ENV=development
PORT=5000JWT_SECRET=
JWT_EXPIRE=
JWT_COOKIE_EXPIRE=X_SERVER_KEY=
MONGO_URI=

Creating our Database

At config/db.js add the following code

const mongoose = require(“mongoose”);const connectDB = async () => {
const conn = await mongoose.connect(process.env.MONGO_URI, {
useNewUrlParser: true,
useUnifiedTopology: true,
});
console.log(`MongoDB Connected: ${conn.connection.host}`.cyan.underline);
};
mongoose.set(“strictQuery”, false);module.exports = connectDB;

We’ll be creating our database on MongoDB. The code above is for connecting to our database through Mongoose.

Creating the Data Model

At models/User.js add the following code:

const crypto = require(“crypto”);
const mongoose = require(“mongoose”);
const bcrypt = require(“bcryptjs”);
const jwt = require(“jsonwebtoken”);const UserSchema = new mongoose.Schema(
{
Name: {
type: String,
required: true,
},
phone: {
type: String,
required: true,
},
pin: {
type: String,
required: true,
minlength: 4,
select: false,
},amount: {
required: true,
type: Number,
},
},
{
timestamps: true, // mongoose creates time fields (createdAt & updatedAt) automatically
}
);

// Encrypt pin using bcrypt
UserSchema.pre(“save”, async function (next) {
if (!this.isModified(“pin”)) {
next();
}

const salt = await bcrypt.genSalt(10);
this.pin = await bcrypt.hash(this.pin, salt);
});

// Match user entered pin to hashed pin in database
UserSchema.methods.matchPassword = async function (enteredPin) {
return await bcrypt.compare(enteredPin, this.pin);
};

module.exports = mongoose.model(“User”, UserSchema);

The code above is our mongoose Schema. Generally, what is done here is creating fields where it will be captured by our database i.e name, phone, pin & amount. Also note that there is a middleware which will be used to encrypt the user’s pin.

At server.js add the following code:

const path = require(“path”);
const express = require(“express”);
const colors = require(“colors”);
const dotenv = require(“dotenv”);
const morgan = require(“morgan”);
const _ = require(“lodash”);
const UssdMenu = require(“ussd-builder”);
const session = require(“./utils/sessionHandler”);
const { notFound, errorHandler } = require(“./middleware/error”);
const connectDB = require(“./config/db”);// Load env vars
dotenv.config();let menu = new UssdMenu();

// Connect to database
connectDB();

// Route files
const List = require(“./menu”);

// Initialize express
const app = express();

// Body-parser –responsible for parsing the incoming request bodies in a middleware before you handle it
app.use(express.json());
app.use(express.urlencoded({ extended: true }));

// Dev logging middleware
if (process.env.NODE_ENV === “development”) {
app.use(morgan(“dev”));
}

// Set static folder
const publicDirPath = path.join(__dirname, “public”);
app.use(express.static(publicDirPath));

// File extensions
app.use(
express.static(publicDirPath, {
extensions: [“html”, “css”, “js”, “png”, “jpg”, “json”, “ico”],
})
);

// Registering USSD handler with Express
_.over([session, List])(menu);

app.post(“/”, async (req, res, next) => {
try {
await menu.run(req.body, (ussdResult) => {
res.send(ussdResult);

This is where you call all of your library files and run the application server.

User data

Paste the following code in your_data/user.json file:

[
{
“_id”: “5d7a514b5d2c12c7449be042”,
“Name”: “John Doe”,
“phone”: “254700000001”,
“pin”: 2541,
“amount”: 1000000
},
{
“_id”: “5d7a514b5d2c12c7449be043”,
“Name”: “Kevin Smith”,
“phone”: “254700000002”,
“pin”: 2542,
“amount”: 650000
},
{
“_id”: “5d7a514b5d2c12c7449be044”,
“Name”: “Sasha Ryan”,
“phone”: “254700000003”,
“pin”: 2543,
“amount”: 470000
}
]

Export data to MongoDB

Here you can add the json file above to mongoDb and also delete all.

node seeder -i // Send data to mongo-db
node seeder -d // Destroy all the data in mongo-db

Paste the following code in your seeder.js file:

const fs = require(“fs”);
const mongoose = require(“mongoose”);
const colors = require(“colors”);
const dotenv = require(“dotenv”);
const connectDB = require(“./config/db”);// Load env vars
dotenv.config();

// Load models
const User = require(“./models/User”);

// Connect to DB
connectDB();

// Read JSON files
const users = JSON.parse(
fs.readFileSync(`${__dirname}/_data/users.json`, “utf-8”)
);

// Import into DB
const importData = async () => {
try {
await User.create(users);
console.log(“Data Imported…”.green.inverse);
process.exit();
} catch (err) {
console.error(err);
}
};

// Delete data
const deleteData = async () => {
try {
await User.deleteMany();
console.log(“Data Destroyed…”.red.inverse);
process.exit();
} catch (err) {
console.error(err);
}
};

if (process.argv[2] === “-i”) {
importData();
} else if (process.argv[2] === “-d”) {
deleteData();
}

The code above allows you to add or delete the json payload to your mongo-db.

Controllers

Paste the following code in your controllers/users.js file:

const ErrorResponse = require(“../utils/errorResponse”);
const asyncHandler = require(“../middleware/async”);
const User = require(“../models/User”);// @desc Get single user
exports.getUser = async (phone) => {
try {
const user = await User.findOne({ phone: phone }).exec();
if (!user) return null;

return user;
} catch (error) {
return undefined;
}
};

// @desc Create user
exports.createUser = async (data) => {
try {
const user = await User.create(data);
Promise.resolve(user);
return user;
} catch (error) {
return error;
}
};

// @desc update Balance
exports.updateBalance = async (amount, phone) => {
try {
const user = await User.where(“phone”, phone).update({
$set: { amount: amount },
});

return user;
} catch (error) {
return error;
}
};

// @desc login
exports.login = async (pin, phone) => {
try {
const user = await User.findOne({ phone }).select(“+pin”).exec();
if (!user) return null;

// Check if pin matches
const isMatch = await user.matchPassword(pin);
if (!isMatch) return null;

sendTokenResponse(user, 200, res);
Promise.resolve(isMatch);
} catch (error) {
return error;
}
};

Here is where CRUD, (Create, Read, Update & Delete ) methods are

Creating USSD Menu

Here the users will be able to register an account to the cash saving App, enter the amount to his/her wallet and then have the ability to check the wallet balance and send cash to an existing user in the database.

We are going to use the ussd-builder library to create our menus.
Paste the following code in your Menu/index.js file:

const dotenv = require(“dotenv”);
const _ = require(“lodash”);
const { getUser } = require(“../controllers/users”);const dashboard = require(“./dashboard”);
const register = require(“./register”);

// Load env vars
dotenv.config();

module.exports = (menu) => {
// Define menu states
menu.startState({
run: async () => {
// use menu.con() to send response without terminating session

const { phoneNumber } = menu.args;
const user = await getUser(phoneNumber);

if (user) {
menu.con(
`Welcome back ${user.Name} to Cash savings:` +
“\nEnter your 4-digit PIN to continue:”
);
} else {
menu.con(“Welcome to Cash savings:” + “\n1. Get started” + “\n0. Exit”);
}
},
// next object links to next state based on user input
next: {
“*\\d{4}”: “dashboard”,
1: “register”,
0: “Exit”,
},

defaultNext: “invalidOption”,
});

menu.state(“Exit”, {
run: () => {
menu.end(“Goodbye :)”);
},
});

menu.state(“invalidOption”, {
run: () => {
menu.end(`Invalid option`);
},
});

menu.state(“IncorrectInput”, {
run: () => {
menu.end(`Incorrect input`);

The code above will check if there’s an already existing user in the database, if not, the user will be prompted to register his/her self. If the pin is accepted the user will be redirected to the dashboard menu.

Paste the following code in your Menu/dashboard.js file

const _ = require(“lodash”);
const { login } = require(“../controllers/users”);
const { session } = require(“../utils/sessionHandler”);const savings = require(“./savings”);
const sendMoney = require(“./sendMoney”);
const settings = require(“./settings”);
const statement = require(“./statement”);

module.exports = (menu) => {
// Define menu states

menu.state(“dashboard”, {
run: async () => {
const {
val,
args: { phoneNumber },
} = menu;
session[“newPin”] = val;

if (session.newPin) {
// Save the data to Mongo
await login(session.newPin, phoneNumber).then((res) => {
if (res) {
menu.con(
`Choose a service to proceed:` +
“\n1. Send Money” +
“\n2. Check savings” +
“\n3. View Mini-statement” +
“\n4. Change PIN” +
“\n0. Exit”
);
} else {
menu.go(“dashboard.WrongPin”);
}
});
} else {
menu.end(`invalid`);
}
},
// next object links to next state based on user input
next: {
1: “dashboard.sendMoney”,
2: “dashboard.savings”,
3: “dashboard.statement”,
4: “dashboard.settings”,
0: “Exit”,
},

defaultNext: “invalidOption”,
});

menu.state(“dashboard.WrongPin”, {

In the dashboard menu, the user will see a list of items

Paste the following code in your Menu/register.js file

const _ = require(“lodash”);
const { createUser } = require(“../controllers/users”);
const { session } = require(“../utils/sessionHandler”);

module.exports = (menu) => {
// Define menu states
menu.state(“register”, {
run: () => {
menu.con(“Enter your Name”);
},
// using regex to match user input to next state
next: {
“*[a-zA-Z]+”: “register.amount”,
},
});

menu.state(“register.amount”, {
run: async () => {
const { val } = menu;
session[“name”] = val;
menu.con(“Enter amount”);
},

// using regex to match user input to next state
next: {
“*\\d+”: “register.pin”,
},
});

menu.state(“register.pin”, {
run: async () => {
const { val } = menu;
session[“amount”] = val;
menu.con(“Enter your pin”);
},

// using regex to match user input to next state
next: {
“*\\d+”: “end”,
},
});

menu.state(“end”, {
run: async () => {
const {
val,
args: { phoneNumber },
} = menu;
session[“pin”] = val;

// Save the data to Mongo
await createUser({
Name: session.name,

Paste the following code in your Menu/savings.js file

const { getUser } = require(“../controllers/users”);module.exports = (menu) => {
// Define menu states
menu.state(“dashboard.savings”, {
run: async () => {
// use menu.con() to send response without terminating session

const { phoneNumber } = menu.args;
const user = await getUser(phoneNumber);

menu.con(`Your savings are: ${user.amount} \n0. Dashboard`);
},
// next object links to next state based on user input
next: {
0: “dashboard”,
},
});

return menu;
};

Paste the following code in your Menu/sendMoney.js file

const { getUser, updateBalance } = require(“../controllers/users”);
const { session } = require(“../utils/sessionHandler”);module.exports = (menu) => {
// Define menu states
menu.state(“dashboard.sendMoney”, {
run: async () => {
const { val } = menu;
menu.con(`Enter amount to send`);
},
// next object links to next state based on user input
next: {
“*\\d”: “dashboard.sendMoney.receiver”,
},
defaultNext: “IncorrectInput”,
});

menu.state(“dashboard.sendMoney.receiver”, {
run: async () => {
const {
val,
args: { phoneNumber },
} = menu;
session[“amount”] = val;
const user = await getUser(phoneNumber);
const enteredAmount = JSON.parse(val);

console.log(enteredAmount, user.amount);

if (val > user.amount) {
menu.end(“Sorry, you don’t have sufficient amount to send!”);
} else {
menu.con(`Enter phone number to send to`);
}
},
// next object links to next state based on user input
next: {
“*\\d{10}”: “dashboard.sendMoney.send”,
},
defaultNext: “IncorrectInput”,
});

menu.state(“dashboard.sendMoney.send”, {
run: async () => {
const {
val,
args: { phoneNumber },
} = menu;

const sender = await getUser(phoneNumber);
const reciever = await getUser(val);

if (reciever) {

Paste the following code in your Menu/settings.js file

const { changePin } = require(“../controllers/users”);
const { session } = require(“../utils/sessionHandler”);module.exports = (menu) => {
// Define menu states
menu.state(“dashboard.settings”, {
run: async () => {
menu.con(`Enter your 4-digit new PIN`);
},
// next object links to next state based on user input
next: {
“*\\d{4}”: “dashboard.settings.newPin”,
},
});

menu.state(“dashboard.settings.newPin”, {
run: async () => {
const { val } = menu;
session[“newPin”] = val;
menu.con(`Confirm your 4-digit new pin`);
},
// next object links to next state based on user input
next: {
“*\\d{4}”: “dashboard.settings.updatePin”,
},
defaultNext: “invalidOption”,
});

menu.state(“dashboard.settings.updatePin”, {
run: async () => {
const {
val,
args: { phoneNumber },
} = menu;

if (session.newPin === val) {
await changePin(val, phoneNumber);
menu.end(`You have successfully changed your PIN! `);
} else {
menu.end(`Your new PIN don’t match`);
}
},
});

menu.state(“invalidOption”, {
run: () => {
menu.end(`Invalid option`);
},
});

return menu;
};

Paste the following code in your Menu/statement.js file

module.exports = (menu) => {
// Define menu states
menu.state(“dashboard.statement”, {
run: async () => {
menu.end(
`Sorry, this service is unavailable. Please try again later.`
);
},
});return menu;
};

Add session Handler

This is where you can store temporary user data that persists through an entire session.
Paste the following code in your utils/sessionHandler.js file

const UssdMenu = require(“ussd-builder”);

let sessions = {};
let menu = new UssdMenu();

menu.sessionConfig({
start: (sessionId, callback) => {
// initialize current session if it doesn’t exist
// this is called by menu.run()
if (!(sessionId in sessions)) sessions[sessionId] = {};
callback();
},
end: (sessionId, callback) => {
// clear current session
// this is called by menu.end()
delete sessions[sessionId];
callback();
},
set: (sessionId, key, value, callback) => {
// store key-value pair in current session
sessions[sessionId][key] = value;
callback();
},
get: (sessionId, key, callback) => {
// retrieve value by key in current session
let value = sessions[sessionId][key];
callback(null, value);
},
});

module.exports = menu;

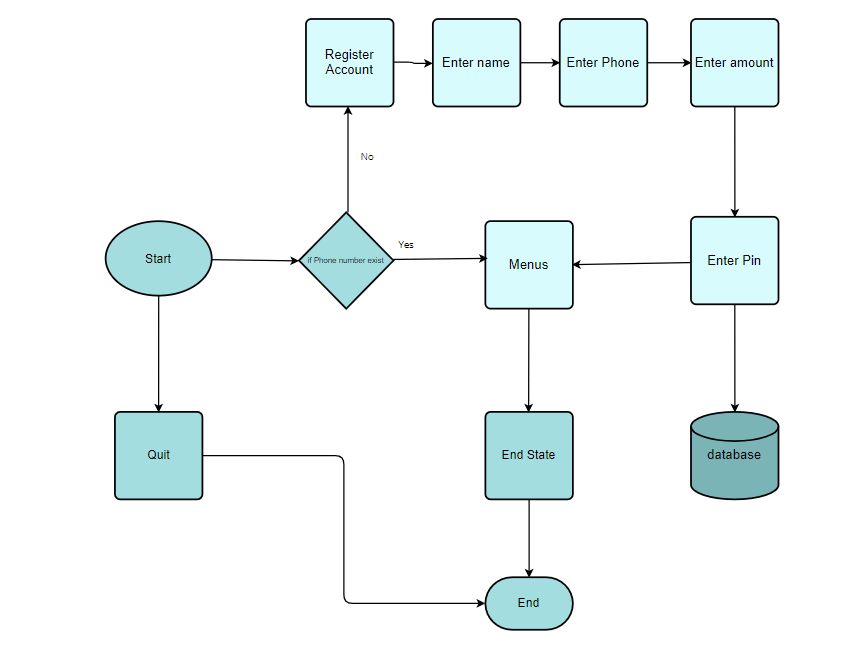
The code above is illustrated by the flow chart diagram below;

Create a folder called Public and add an html file inside

mkdir public
cd public
touch index.html

This is where you put static assets that can be viewed by everybody. Paste the following code to your index.html file

Testing the App

Go to your terminal and run

npm run dev

Your browser should open the project at http://localhost:5000/
Go to your postman application, create a new collection and add a new POST Request. Run the project on your local machine, then copy the url on your browser, paste the url on postman,
Add the following request body below then send the request to test your application.

{
“phoneNumber”: “254700000002”,
“sessionId”: “abcdef123456”,
“serviceCode”: “”,
“operator”: “”,
“text”: “”
}

Note: A string containing the input at each hop, is separated by the asterisk symbol (*). E.g

“text”:”1*2*3″

for menu navigation. This is parsed by the UssdMenu to find the appropriate state to run at each hop.